This version of the OpenSearch documentation is no longer maintained. For the latest version, see the current documentation. For information about OpenSearch version maintenance, see Release Schedule and Maintenance Policy.
Compare search results
Compare Search Results is an experimental feature. For updates on the progress of Compare Search Results and other search relevance features, or if you want to leave feedback that could help improve the feature, join the discussion on the OpenSearch forum.
Compare Search Results is the first search relevance feature in OpenSearch. It lets you compare search results from two queries side by side to determine whether one query produces better results than the other. Using this tool, you can evaluate search quality by experimenting with queries.
For example, you can see how results change when you apply one of the following query changes:
- Weighting different fields differently
- Different stemming or lemmatization strategies
- Shingling
Prerequisites
Before you get started, you must index data in OpenSearch. To learn how to create a new index, see Index data.
Alternatively, you can add sample data in OpenSearch Dashboards using the following steps:
- On the top menu bar, go to OpenSearch Dashboards > Overview.
- Select View app directory.
- Select Add sample data.
- Choose one of the built-in datasets and select Add data.
Using Compare Search Results in OpenSearch Dashboards
To compare search results in OpenSearch Dashboards, perform the following steps.
Step 1: On the top menu bar, go to OpenSearch Plugins > Search Relevance.
Step 2: Enter the search text in the search bar.
Step 3: Select an index for Query 1 and enter a query (request body only) in OpenSearch Query DSL. The GET HTTP method and the _search endpoint are implicit. Use the %SearchText% variable to refer to the text in the search bar.
The following is an example query:
{
  "query": {
    "multi_match": {
      "query": "%SearchText%",
      "fields": [ "description", "item_name" ]
    }
  }
}
Step 4: Select an index for Query 2 and enter a query (request body only).
The following example query boosts the title field in search results:
{
  "query": {
    "multi_match": {
      "query": "%SearchText%",
      "fields": [ "description", "item_name^3" ]
    }
  }
}
Step 5: Select Search and compare the results in Result 1 and Result 2.
The following example screen shows a search for the word “cup” in the description and item_name fields with and without boosting the item_name:
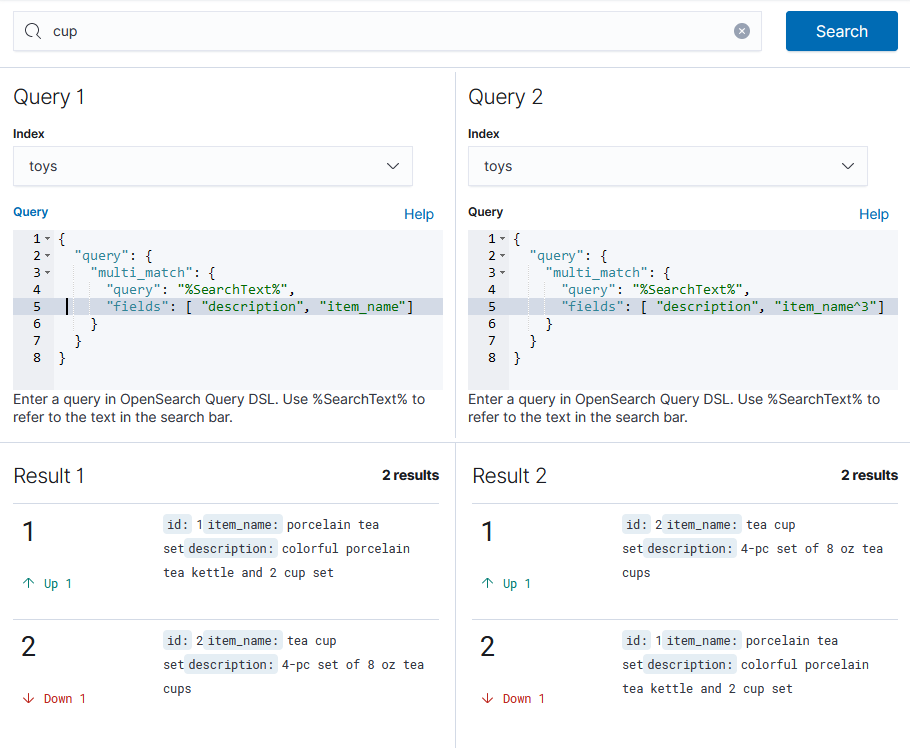
If a result in Result 1 appears in Result 2, the Up and Down indicators below the result number signify how many places the result moved up or down compared to the same result in Result 2. In this example, the document with the ID 2 is Up 1 place in Result 2 compared to Result 1 and Down 1 place in Result 1 compared to Result 2.
Changing the number of results
By default, OpenSearch returns the top 10 results. To change the number of returned results to a different value, specify the size parameter in the query:
{
  "size": 15,
  "query": {
    "multi_match": {
      "query": "%SearchText%",
      "fields": [ "title^3", "text" ]
    }
  }
}
Setting size to a high value (for example, larger than 250 documents) may degrade performance.
You cannot save a given comparison for future use, so Compare Search Results is not suitable for systematic testing.
Comparing OpenSearch search results with re-ranked results
One use case for Compare Search Results is to compare raw OpenSearch results with the same results processed by a re-ranking application. An example of such a re-ranker is Kendra Intelligent Ranking for OpenSearch, contributed by the Amazon Kendra team. This plugin takes search results from OpenSearch and applies Amazon Kendra’s semantic relevance rankings calculated using vector embeddings and other semantic search techniques. For many applications, this provides better result rankings.
To try Kendra Intelligent Ranking, you must first set up the Amazon Kendra service. To get started, see Amazon Kendra. For detailed information, including plugin setup instructions, see Intelligently ranking OpenSearch (self managed) results using Amazon Kendra.
Once you’ve set up Kendra Intelligent Ranking, enter a query in Query 1 and enter the same query using Kendra Intelligent Ranking in Query 2. Then compare the search results from OpenSearch and Amazon Kendra.
Example
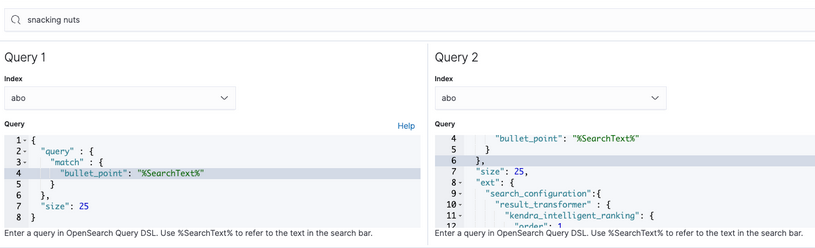
The following example searches for the text “snacking nuts” in the abo index. The documents in the index contain snack descriptions in the bullet_point array.
- Enter
snacking nutsin the search bar. -
Enter the following query, which searches the
bullet_pointfield for the search text “snacking nuts”, in Query 1:{ "query": { "match": { "bullet_point": "%SearchText%" } }, "size": 25 } -
Enter the same query with intelligent ranking in Query 2:
 {
   "query" : {
     "match" : {
       "bullet_point": "%SearchText%"
     }
   },
   "size": 25,
   "ext": {
     "search_configuration":{
       "result_transformer" : {
         "kendra_intelligent_ranking": {
           "order": 1,
           "properties": {
             "title_field": "item_name",
             "body_field": "bullet_point"
           }
         }
       }
     }
   }
 }
In the preceding query,
body_fieldrefers to the body field of the documents in the index, which Kendra Intelligent Ranking uses to rank the results. Thebody_fieldis required, while thetitle_fieldis optional. - Select Search and compare the results in Result 1 and Result 2.