Log analytics has grown to be one of OpenSearch’s popular use cases as it is able to easily ingest, secure, search, visualize, and analyze log data. The automated alerting feature can further help you by automatically detecting problems from your ingested data. When a problem is detected, you can send an alert to external systems like Slack, email, and more. For example, you might want to create an alert and notify a Slack channel if your application logs see more than five HTTP 503 errors within an hour. In this blog we walk through setting up an alerting policy and discuss how the alerting plugin works.
Let’s setup an alerting monitor
Before beginning, if you don’t have an OpenSearch cluster setup, we recommend setting up a cluster using OpenSearch with Docker Compose.
Now that you have a running OpenSearch cluster, let’s set up a monitor. The first step is to choose an index to be monitored, either use an existing index or create a new one. To create a sample index, run the below curl from the terminal.
curl -X PUT -u admin:admin --insecure 'https://localhost:9200/sample-logs' -H 'Content-Type:application/json' -d '{
  "mappings": {
    "properties": {
      "@timestamp": {
        "type": "date"
      },
      "host_address": {
        "type": "text",
        "fields": {
          "keyword": {
            "type": "keyword",
            "ignore_above": 256
          }
        }
      },
      "http_code": {
        "type": "integer"
      },
      "message": {
        "type": "text"
      }
    }
  }
}'
Next, you need to create monitors to receive automated alerts on data ingested in this index. You can create a monitor using the Alerting UI in OpenSearch Dashboards or the REST API. The UI provides an interactive way to create a monitor and provides a validation feature that checks for the monitor’s query correctness and performance. On the other hand, the API is for programatic configuration. For example, you might use the API to build automation scripts for sharing configurations across multiple clusters. To create the monitor for the ‘sample-logs’ index, run the curl command below.
curl -XPOST -u admin:admin --insecure  'https://localhost:9200/_plugins/_alerting/monitors?pretty' -H 'Content-Type:application/json' -d'{
  "name": "sample-monitor",
  "enabled": true,
  "inputs": [
    {
      "search": {
        "indices": [
          "sample-logs"
        ],
        "query": {
          "size": 0,
          "aggregations": {},
          "query": {
            "bool": {
              "filter": {
                "range": {
                  "@timestamp": {
                    "from": "||-1h",
                    "to": ""
                  }
                }
              },
              "must": {
                "term": {
                  "http_code": 403
                }
              }
            }
          }
        }
      }
    }
  ],
  "schedule": {
    "period": {
      "interval": 10,
      "unit": "MINUTES"
    }
  },
  "triggers": [
    {
      "name": "count-trigger",
      "severity": "1",
      "condition": {
        "script": {
          "source": "ctx.results[0].hits.total.value > 5",
          "lang": "painless"
        }
      },
      "actions": []
    }
  ]
}'
A few important details for the monitor definition:
- Schedule: The schedule defines how often the monitor runs. The value you choose should be based on how often you want to alert on the indexed data, the indexing rate, and the maximum delay you expect between generating a documents and it reaching OpenSearch.
- Indices: You must provide one or more OpenSearch indices to run the monitor query on. You can also use a wildcard (*) in index name if you want to monitor data from multiple indexes. These monitored indices must contain time-series data with at least one date field.
- Extraction query: The extraction query is an OpenSearch DSL query that the monitor runs on the defined schedule. There are many options for writing the DSL query. Our sample uses a
boolquery that combines arange filterclause on the time field and amustclause onhttp_code. - Trigger: A trigger is a condition that, if met, generates an alert. At least one trigger needs to be defined per monitor to generate an alert. To create a trigger you need to define a trigger condition and an alert severity. The alert severity allows you to highlight the significance of the alert. The trigger condition uses an inline plainless script that returns true or false. When it returns true, the condition has been met. It is worth noting that the results from the extraction query can be used in triggers via the
ctx.results[0]variable. In our example, the trigger returnstruewhen the extraction query “hits” count is greater than 5. - Actions: When a trigger condition is met it runs a set of actions (e.g. sending a notification to a Slack channel). Actions are optional.
Now that you ran the command to create a monitor, you can check that it was created by running the following command:
curl -X GET -u admin:admin --insecure  'https://localhost:9200/_plugins/_alerting/monitors/_search?pretty' -H 'Content-Type:application/json' -d'{
  "query": {
    "match" : {
      "monitor.name": "sample-monitor"
    }
  }
}'
How and When does this monitor run?
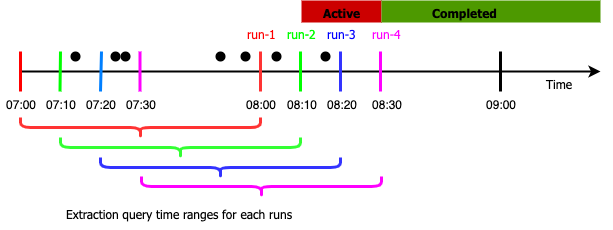
Now that you have setup the sample monitor, let’s discuss how it works. Monitors are run as periodic jobs on OpenSearch data nodes. The below picture illustrates four runs of our example monitor. Assuming the monitor was created at 8:00am, the first run (run-1) starts at 8:00am. It returns search hits for the documents whose timestamps are between 7:00am and 8:00am. Similarly, run-2 runs at 8:10am and returns search hits between 7:10am and 8:10am. For run-1 the trigger condition is not met as there are only 5 documents that match the criteria. However, run-2 at 8:10am creates an alert because the trigger condition is met with 6 documents returning from the query. During run-3 the trigger condition is still met and alert remains active. Finally, during run-4 the trigger condition is no longer met, and so the alert state changes from “Active” to “Completed”. Note that if there is significant delay in indexing documents, you might miss alerts. For example in the figure below, if new documents with timestamps between 7:00am and 7:10am arrive after 8:00am those wont get counted in the extraction query results of run-2, run-3 , run-4
Now that you have a working monitor, let’s trigger an alert. The below command ingests data into the sample-logs index. Make sure to change the timestamp to be in the last one hour to generate alerts.
curl -X POST -u admin:admin --insecure 'https://localhost:9200/sample-logs/_doc?pretty' -H 'Content-Type:application/json' -d '{
"@timestamp": "2021-10-11T10:30:12",
"host_address": "10.12.120.228",
"http_code": 403,
"message": "Hello! This is a sample response."
}‘
Next you can check for alerts from either the alerting UI, or you can use the API commands below:
curl -X GET -u admin:admin --insecure 'https://localhost:9200/_plugins/_alerting/monitors/alerts`?pretty`'
If you have an alert, you can acknowledge it so that it does not continue to send notifications using the alerting UI or the below command:
curl -X POST -u admin:admin --insecure  'https://localhost:9200/_plugins/_alerting/monitors/<monitor_id>/_acknowledge/alerts?pretty' -H 'Content-Type:application/json' -d'{
    "alerts": ["`<alert_id>`"]
}'
The lifecycle of an alert
Now that you have triggering an alert, let’s dive a bit deeper into the lifecycle of an alert. The below picture shows the alert states as vertices and state changes as edges. The alert state is evaluated every time its monitor runs.
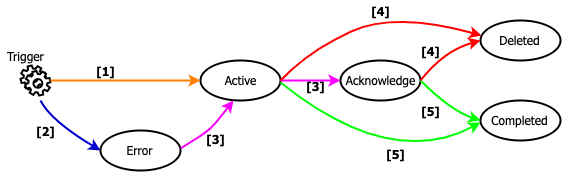
- First, if the configured actions for that trigger are successfully executed, the alert is created in the ACTIVE state and stored in the
.opendistro-alertings-alertsindex. - If the alert fails to execute an action it will be created in ERROR state.
- Once ACTIVE, the alert state can be changed to the ACKNOWLEDGE state by a user taking action to acknowledge it. This is intended to be used to stop notifications while remediating the alert cause or fixing an alert in the ERROR state.
- If the corresponding monitor or trigger is deleted, the alert enters into DELETE state and is moved to
.opendistro-alertings-alert-history-*indices. - If the corresponding trigger conditional evaluates to false in the next monitor execution, then the alert state is moved to COMPLETED. Once completed, the alert is stored in the
.opendistro-alertings-alert-history-*indices.
By default the alert is stored in the cluster for 60 days, you can change this by using plugins.alerting.alert_history_retention_period setting. The complete list of settings can be found in the alert settings documentation.
Conclusion
OpenSearch alerting provides a powerful mechanism to continuously monitor large volumes of data, and now you know how to use the feature. Give it a try with your own use cases and don’t hesitate to provide feedback. Stay tuned for the next post where we will discuss security with alerting, and dive into how to alert on OpenSearch audit logs.