It’s great to be writing about OpenSearch again!
Today, I’m going to show you how to run OpenSearch with the OpenSearch Operator on Kubernetes using the Bottlerocket and then add Fluent Bit to collect logs from the nodes of the same Kubernetes cluster. Phew. If that seems like a lot, don’t worry—this post will take it bit by bit. I’ll assume you know what OpenSearch is, but what about the rest of that stuff?
- OpenSearch Operator for Kubernetes controls and abstracts the configuration of OpenSearch and OpenSearch Dashboards in the Kubernetes environment.
- Fluent Bit is a logging processor and forwarder that’ll be used to take the raw logs and send them up to OpenSearch for processing.
- Bottlerocket is an open source, container-optimized Linux distribution used on the nodes of a Kubernetes cluster.
Bottlerocket is probably the most unfamiliar of these components, so it’s worth it to zoom in on what makes it different. Most Linux distros are general purpose – you can use them to run a variety of workloads on a bunch of different types of machines. Take Ubuntu: you can run it on your laptop or you can use it on a cloud instance. To be general purpose, these distros can’t make many assumptions so they have to have a wide variety of software to support the general purpose mission of the OS. There are many specially optimized Linux distros such as OpenWrt for routers or even one that is optimized to only run Doom. While the goals of these distros are vastly different, the philosophy is the same: remove what you don’t need and only add what you do. Bottlerocket’s goal is to be able to host containers and nothing more. Today, you can run Bottlerocket on EC2, VMware vSphere, and on bare metal with plans for more platforms and hardware support in the future.
What’s actually needed for hosting containers is surprisingly minimal. In Bottlerocket, two notable differences are the lack of a shell and a read-only root file system. Instead of a shell, containerd is run right from systemd and actually there are two isolated instances of containerd – one for hosting your orchestrated containers and the other containerd for “host containers,” which are privileged containers used only for operational and administrative purposes. To configure and manipulate the node, you can use Bottlerocket’s API which is only available to privileged containers. This means your nodes come up and reboot faster because there is no slow shell, scripts, or interpreted software to instantiate. Lacking a shell also results in a smaller security surface area.
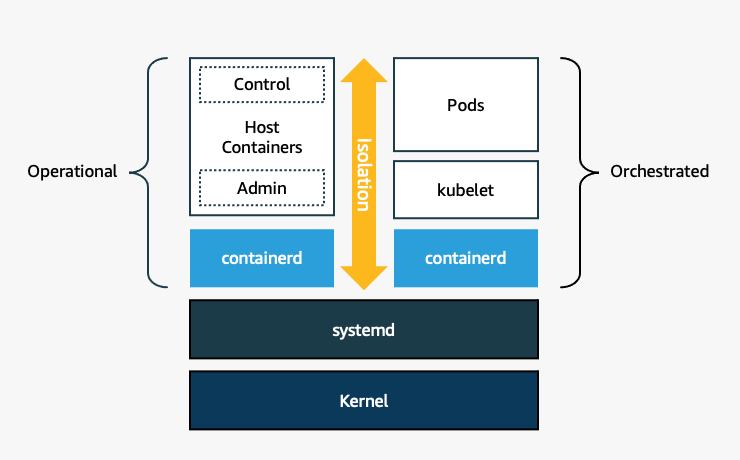
This does present some challenges – how the heck do you configure the nodes for OpenSearch and install Fluent Bit on the node if there is no shell? Well, dear reader, charge forward and you will find out.
Getting the nodes ready for running OpenSearch
Setting up your Bottlerocket Nodes
One quirk of OpenSearch is that it has special requirements for the Linux setting of vm.max_map_count . It must be equal or greater to 262144. This even has to occur on the host machine running the container. Normally you would use something like sysctl either manually or set a value in /etc/sysctl.conf. Without a shell and with a read-only root file system, this might sound challenging, but turns out, it’s not so bad.
What you need is provided by the Bottlerocket API instead of the shell or configuration scripts. This can be accomplished with the API and the apiclient on each node:
apiclient set --json '{"kernel": {"sysctl": {"vm.max_map_count": "262144"} } }'
Typically, you would run apiclient from the control container, but you’d need to manually visit every node in the cluster for this change: no one wants to do that! Kubernetes has the concept of DaemonSet that will run on every node in a cluster. However, an unprivileged container in Kubernetes wouldn’t have the ability to run this command. What you can do is setup a DaemonSet that has the correct securityContext and socket connection to the Bottlerocket API using this spec:
---
apiVersion: apps/v1
kind: DaemonSet
metadata:
  name: api-pod
spec:
  selector:
    matchLabels:
      name: all-nodes
  template:
    metadata:
      labels:
        name: all-nodes
    spec:
      volumes:
      - name: api-socket
        hostPath:
          path: /run/api.sock
      - name: apiclient
        hostPath:
          path: /usr/bin/apiclient
      containers:
      - name:  api
        image: debian:bullseye-slim
        command:
        - /bin/sh
        - "-c"
        - "apiclient set --json '{\"kernel\": {\"sysctl\": {\"vm.max_map_count\": \"262144\" } } }'"
        volumeMounts:
        - mountPath: /run/api.sock
          name: api-socket
        - mountPath: /usr/bin/apiclient
          name: apiclient
        securityContext:
          privileged: true
If you saved this as api-pod-daemonset.yaml you apply this with kubectl apply -f ./api-pod-daemonset.yaml. If you look at kubectl get pods, it will likely show these pods are constantly restarting – DaemonSet’s are designed to run continuously and we only need this to run for enough time to send the apiclient set once. Once you see that it’s run at least once, you can then run kubectl delete with the same spec file to remove the DaemonSet. Since the DaemonSet has altered the underlying node configuration, removing the DaemonSet won’t undo the changes.
If you’re using EKS and eksctl, you don’t even have to do this. In the config file you pass into eksctl create cluster you can add the bottlerocket map to nodeGroups like this:
...
nodeGroups:
    ...
    bottlerocket:
      settings:
        kernel:
          sysctl:
            vm.max_map_count: "262144"
Either way, all your nodes in the group will be configured to have the correct vm.max_map_count value.
Running OpenSearch with the OpenSearch Operator
The recently developed Kubernetes operator for OpenSearch will work just fine on this cluster – the fact that Bottlerocket is the OS is transparent to the operator. The following steps are based off of the quick start guide from the OpenSearch operator repo:
First, add and install the opensearch-operator using Helm:
helm repo add opensearch-operator https://opster.github.io/opensearch-k8s-operator/
helm install opensearch-operator opensearch-operator/opensearch-operator
Then create your config file for the operator, I called it opensearch-cluster.yaml:
apiVersion: opensearch.opster.io/v1
kind: OpenSearchCluster
metadata:
  name: opensearch-cluster
  namespace: default
spec:
  general:
    serviceName: opensearch-cluster
    httpPort: 9200
    version: 1.3.1
  dashboards:
    enable: true
    version: 1.3.1
    replicas: 1
    resources:
      requests:
         memory: "512Mi"
         cpu: "200m"
      limits:
         memory: "512Mi"
         cpu: "200m"
  nodePools:
    - component: masters
      replicas: 3
      diskSize: "5Gi"
      NodeSelector:
      resources:
         requests:
            memory: "2Gi"
            cpu: "500m"
         limits:
            memory: "2Gi"
            cpu: "500m"
      roles:
        - "data"
        - "master"
Then you apply the file using kubectl:
kubectl apply -f opensearch-cluster.yaml
This will create a bootstrap node, then 3 pods for master nodes of OpenSearch and 1 pod for OpenSearch Dashboards. If you run watch -n 2 kubectl get pods while it’s starting you can see the pods come online live. Once you see opensearch-cluster-masters-2 in the running state, then your cluster is ready to go. It should look something like this:
NAME                                                      READY   STATUS    RESTARTS   AGE
opensearch-cluster-dashboards-545f67d7f4-wp426            1/1     Running   0          8m4s
opensearch-cluster-masters-0                              1/1     Running   0          8m4s
opensearch-cluster-masters-1                              1/1     Running   0          5m28s
opensearch-cluster-masters-2                              1/1     Running   0          3m21s
opensearch-operator-controller-manager-597cbf7fd4-r8z59   2/2     Running   0          9m20s
Now, depending on how you’re running, exposing, or intending to access your Kubernetes cluster, you may not have access to OpenSearch Dashboards. In my case, I added an ingress controller and configured the routing rules as follows:
...
  rules:
    - http:
        paths:
        - path: /
          pathType: Prefix
          backend:
            service:
              name: opensearch-cluster-dashboards
              port:
                number: 5601
If you’re using the ingress method, you can get the hostname by using kubectl get ingress/<name of your ingress controller> , then point your browser at that hostname.
Once you’ve sorted your preferred way of accessing OpenSearch Dashboards, go ahead and test it out with the username admin and the password admin.
Adding Fluent Bit
Up to this point, you should have a working K8s cluster that uses Bottlerocket instead of a general purpose Linux distro and running in this cluster is OpenSearch and OpenSearch Dashboards. You could manually put some data into OpenSearch, but you probably want to setup something that automatically collects logs. For the purposes of this blog post, I’ll show you how to point Fluent Bit at the node logs of the cluster itself.
Just to be clear: this is a bit of a logging perpetual motion machine – you’ve setup a lot of stuff just to monitor, well, itself. In a more real-world setup you would have other workloads in the Kubernetes cluster along side OpenSearch or even OpenSearch running in a different cluster all together. Many people also use a log aggregator like Fluentd or Logstash to act as an intermediary between OpenSearch and Fluent Bit. Like most things, there is no one right way to make it all work together.
OpenSearch runs with authentication as standard and Fluent Bit will need to know those credentials, so you’re going to need to put your credentials in as a secret. You can do this with kubectl:
kubectl create secret generic opensearchpass \
--from-literal=username=<your username> \
--from-literal=password=<your password>
Now, since we’re looking at kubelet logs, we’re going to need an instance of Fluent Bit for every node. There are many ways to do this, but let’s use the Fluent Bit operator. I’ve adapted the following quick start from Kubesphere’s walkthrough:
apiVersion: fluentbit.fluent.io/v1alpha2
kind: FluentBit
metadata:
  name: fluent-bit
  namespace: default
  labels:
    app.kubernetes.io/name: fluent-bit
spec:
  image: kubesphere/fluent-bit:v1.8.11
  containerLogRealPath: /var/log/containers
  positionDB:
    hostPath:
      path: /var/lib/fluent-bit/
  resources:
    requests:
      cpu: 10m
      memory: 25Mi
    limits:
      cpu: 500m
      memory: 200Mi
  fluentBitConfigName: fluent-bit-only-config
  tolerations:
    - operator: Exists
---
apiVersion: fluentbit.fluent.io/v1alpha2
kind: ClusterFluentBitConfig
metadata:
  name: fluent-bit-only-config
  labels:
    app.kubernetes.io/name: fluent-bit
spec:
  service:
    parsersFile: parsers.conf
  inputSelector:
    matchLabels:
      fluentbit.fluent.io/enabled: "true"
      fluentbit.fluent.io/mode: "fluentbit-only"
  filterSelector:
    matchLabels:
      fluentbit.fluent.io/enabled: "true"
      fluentbit.fluent.io/mode: "fluentbit-only"
  outputSelector:
    matchLabels:
      fluentbit.fluent.io/enabled: "true"
      fluentbit.fluent.io/mode: "fluentbit-only"
---
apiVersion: fluentbit.fluent.io/v1alpha2
kind: ClusterInput
metadata:
  name: kubelet
  labels:
    fluentbit.fluent.io/enabled: "true"
    fluentbit.fluent.io/mode: "fluentbit-only"
spec:
  systemd:
    tag: service.kubelet
    path: /var/log/journal
    db: /fluent-bit/tail/kubelet.db
    dbSync: Normal
    systemdFilter:
      - _SYSTEMD_UNIT=kubelet.service
---
apiVersion: fluentbit.fluent.io/v1alpha2
kind: ClusterFilter
metadata:
  name: systemd
  labels:
    fluentbit.fluent.io/enabled: "true"
    fluentbit.fluent.io/mode: "fluentbit-only"
spec:
  match: service.*
  filters:
  - lua:
      script:
        key: systemd.lua
        name: fluent-bit-lua
      call: add_time
      timeAsTable: true
---
apiVersion: v1
data:
  systemd.lua: |
    function add_time(tag, timestamp, record)
      new_record = {}
      timeStr = os.date("!*t", timestamp["sec"])
      t = string.format("%4d-%02d-%02dT%02d:%02d:%02d.%sZ", timeStr["year"], timeStr["month"], timeStr["day"], timeStr["hour"], timeStr["min"], timeStr["sec"], timestamp["nsec"])
      kubernetes = {}
      kubernetes["pod_name"] = record["_HOSTNAME"]
      kubernetes["container_name"] = record["SYSLOG_IDENTIFIER"]
      kubernetes["namespace_name"] = "kube-system"
      new_record["time"] = t
      new_record["log"] = record["MESSAGE"]
      new_record["kubernetes"] = kubernetes
      return 1, timestamp, new_record
    end
kind: ConfigMap
metadata:
  labels:
    app.kubernetes.io/component: operator
    app.kubernetes.io/name: fluent-bit-lua
  name: fluent-bit-lua
  namespace: default
---
apiVersion: fluentbit.fluent.io/v1alpha2
kind: ClusterOutput
metadata:
  name: es
  labels:
    fluentbit.fluent.io/enabled: "true"
    fluentbit.fluent.io/mode: "fluentbit-only"
spec:
  matchRegex: (?:kube|service)\.(.*)
  es:
    host: opensearch-cluster-masters
    port: 9200
    generateID: true
    logstashPrefix: fluent-log-fb-only
    logstashFormat: true
    timeKey: "@timestamp"
    httpUser:
      valueFrom:
        secretKeyRef:
          name: opensearchpass
          key: username
    httpPassword:
      valueFrom:
        secretKeyRef:
          name: opensearchpass
          key: password
    tls:
      verify: false
A few key differences from the Kubesphere original:
- In the
FluentBitspec,containerLogRealPathneeds to be added and set to/var/log/containers. The default configuration forcontainerLogRealPathis/containerswhich is read-only on Bottlerocket. If you fail to do this you’ll get the errorspec: failed to generate spec: failed to mkdir "/containers": mkdir /containers: read-only file systemwhen the pods try to start. - In the
ClusterOutputspec, I’ve adapted the connection information to work with OpenSearch by adding thehttpUserandhttpPasswordmaps as well as changing thehostto work with the cluster built earlier in this blog post. - I’ve also set the
tlsmap toverify : false. This is due to the self-signed cert that comes standard with OpenSearch.
One other thing to note is that I’m using the es spec because OpenSearch doesn’t have a specific one yet. You can rely on the common lineage here and Fluent Bit isn’t doing any sort of compatibility check.
I’ve saved the file as fluent-bit-opensearch.yaml so it can be applied with kubectl like this:
kubectl apply -f ./fluent-bit-opensearch.yaml
After that, looking at kubectl get pods you should see something that resembles this:
NAME                                                      READY   STATUS    RESTARTS   AGE
fluent-bit-62bjg                                          1/1     Running   0          16m
fluent-bit-fqwm4                                          1/1     Running   0          16m
fluent-bit-n64pd                                          1/1     Running   0          16m
fluent-bit-rtn7m                                          1/1     Running   0          16m
fluent-bit-zb2kz                                          1/1     Running   0          16m
fluent-operator-9646748f-h8xvw                            1/1     Running   0          12m
opensearch-cluster-dashboards-545f67d7f4-wp426            1/1     Running   0          55m
opensearch-cluster-masters-0                              1/1     Running   0          55m
opensearch-cluster-masters-1                              1/1     Running   0          52m
opensearch-cluster-masters-2                              1/1     Running   0          50m
opensearch-operator-controller-manager-597cbf7fd4-r8z59   2/2     Running   0          56m
Why are there five different fluent-bit-xxxx pods? In my case I’m running a cluster of five nodes, the operator knows the size of the cluster and has deployed one instance per node.
Bringing it all together
OK, now that you have all the components, you can start seeing how this all comes together. Fire up OpenSearch Dashboards and head over to Dev Tools (Hamburger menu > Management heading).
On the left side of the screen you can type your queries. First, run the following query to confirm that you’ve go a Fluent Bit sourced index:
GET /_cat/indices/fluent-log-*?h=index
After clicking the play arrow, you should see the index name(s) created by the Fluent Bit example in the right-hand panel.
Now let’s look at one of those indexes by running this query:
GET /<index name>/_search
{
    "query": {
        "match_all": {}
    }
}
This query will show the results on the right in JSON format. The log lines are located under hits.hits.
With this basic information you can build dashboards and visualizations, run queries, set up alerts, and even use anomaly detection to automatically find unusual blips in your kubelet logs.
Bottlerocket, Kubernetes, OpenSearch, and Fluent Bit are powerful when combined. Getting them all configured requires a few special tweaks, but it’s nothing you can’t handle with the right information. If you want to find out more, check out the Bottlerocket GitHub repo or ask a question on the Bottlerocket Discussion Forum.