
You’ve built an agentic AI application. It’s sophisticated, using recursive loops and autonomous tool-calling to navigate data. It passed your local testing, so you deploy it to production.
Then you check the logs.
A user asks for an order update. Your agent retrieves the wrong context, decides it needs to reason through a product manual, and triggers a sequence of expensive, irrelevant tool calls. After several seconds and a surprising inference cost, it returns a confident but unhelpful response. Your dashboard shows a healthy cluster and a successful 200 OK, but your agent just failed in silence.
Why do agents fail in silence?
As AI agents move from prototype to production, organizations face a critical challenge that’s becoming impossible to ignore. Agents are autonomously making decisions, calling tools, and delivering results, yet the teams building them are often operating without visibility. This creates three critical challenges:
- The reasoning gap: You see the final answer that your agent delivers, but you don’t see the hallucinated steps it took to get to the answer. Did it call the wrong API? Did it misinterpret the user’s intent? Did it retry a failed operation three times before succeeding? Without visibility into the reasoning chain, debugging becomes guesswork.
- The cost-latency spiral: Agentic workflows are inherently recursive. A single user query can trigger a cascade of expensive, time-consuming subtasks. Without real-time operational observability, you don’t know which specific tool or sub-agent is depleting your budget. Performance issues are only discovered when the bill arrives.
- The evaluation paradox: Without a systematic way to grade agent performance at scale, teams return to manual spot-checking. How do you know if your latest prompt change improved accuracy by 5% or silently degraded it by 10%? Without structured evaluation, teams can’t confidently deploy agents to production.
How does Agent Health help?
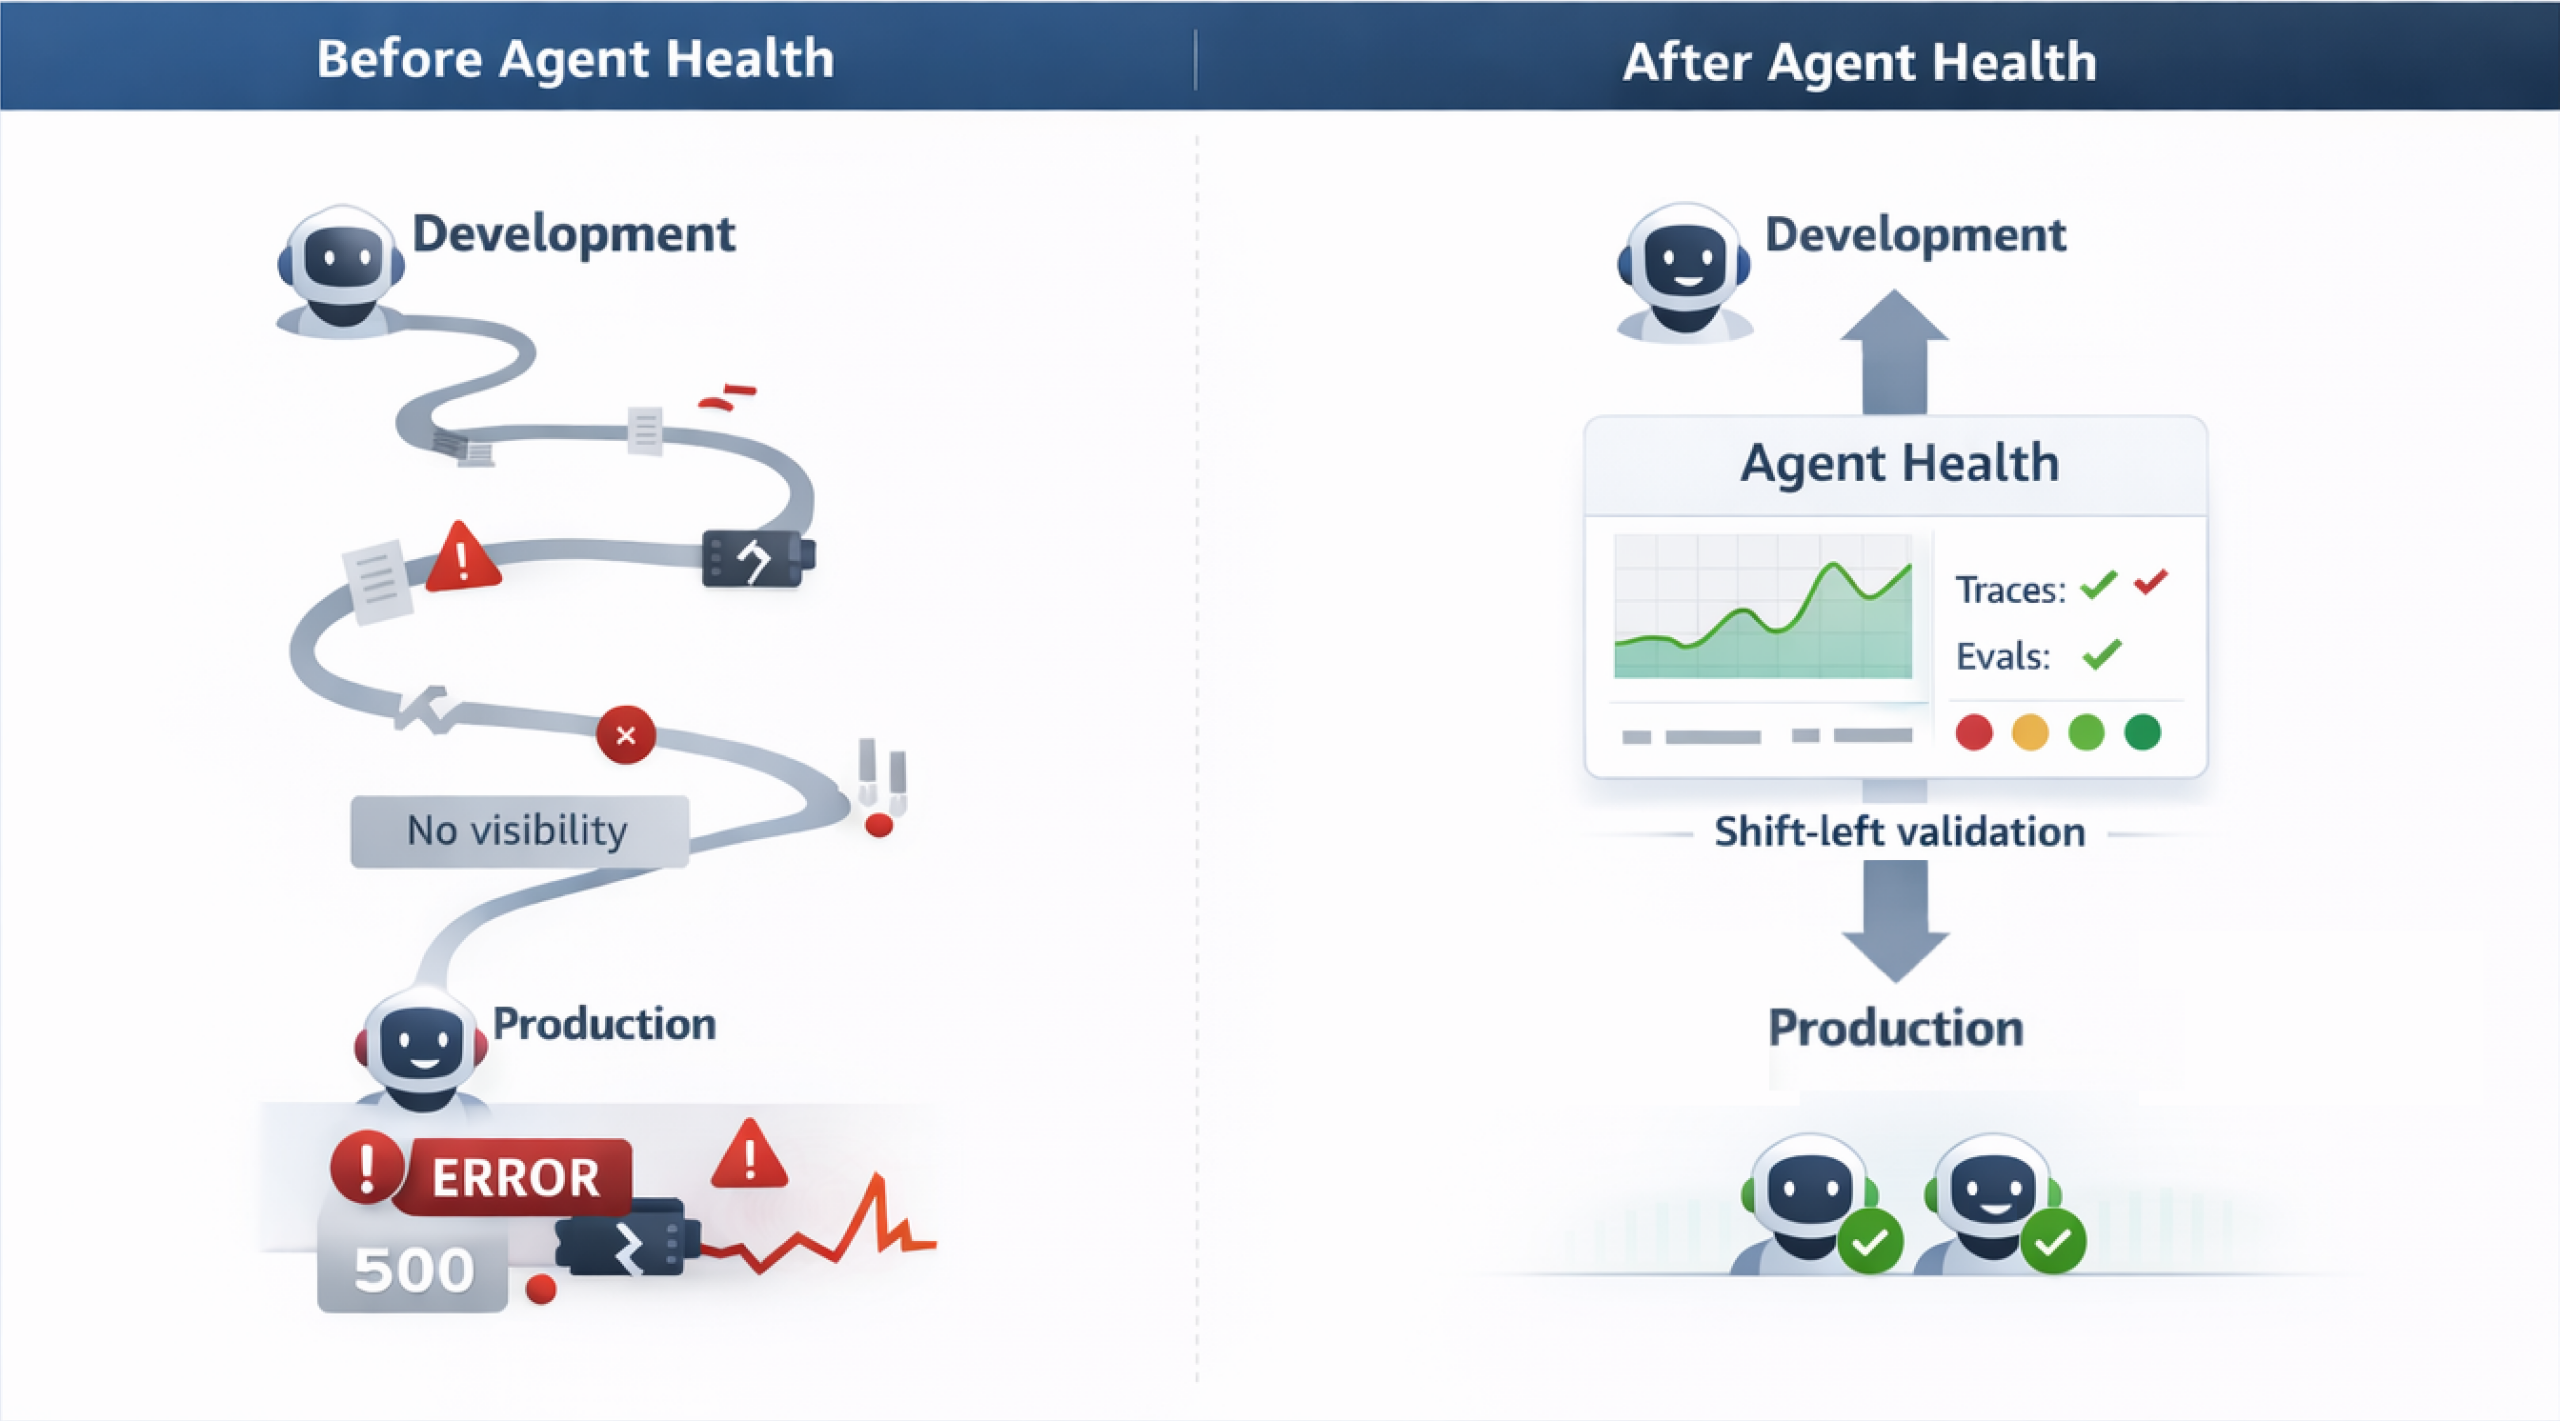
The transition from a multi-month deployment cycle to weekly deployments comes down to eliminating the manual QA process. Every time a prompt is adjusted or a new tool or skill is added to an agent, testing every possible scenario manually is not feasible at scale. Agent Health accelerates development by converting this testing process into an automated, AI-judge-based workflow. By catching regressions early during the development phase (and in CI/CD pipelines) and providing real-time visual traces of exact points where the agent failed or diverged, teams reclaim engineering hours previously lost reviewing logs or waiting for customer incident reports. You debug issues in minutes, test systematically, and deploy with greater confidence. The following diagram shows the difference between traditional agent development and the Agent Health workflow.
 Introducing OpenSearch Agent Health
To get started, run a single command to launch the full Agent Health interface:
npx @opensearch-project/agent-health
# ✓ Server running at http://localhost:4001
# ✓ Demo data loaded
That’s it. No installation required. The full Agent Health interface is available, including traces, benchmarks, evaluations, and comparisons.
OpenSearch Agent Health is an open-source observability and evaluation solution for AI agents. It’s available as a zero-installation NPX tool that delivers three core capabilities in a lightweight (~4 MB) package:
1. Solving the reasoning gap: OpenTelemetry-native trace observability.
Agent Health provides timeline and flow visualizations that show exactly what your agent is doing at every step such as the tools it’s calling, the sequence of decisions, the data flowing between components, and where failures arise. All tracing follows OpenTelemetry standards, so your instrumentation remains portable and works alongside your existing observability tooling.
2. Solving the cost-latency spiral: Structured benchmarking.
Agent Health enables systematic A/B comparison of agent configurations across test suites. Test different prompts, models, or configurations side-by-side, and track results over time. By storing all benchmarks and results in OpenSearch, Agent Health gives you a persistent, queryable history of every evaluation run, so you catch regressions before they reach production, not after.
3. Solving the evaluation paradox: Real-time agent evaluation.
Agent Health uses the golden path trajectory comparison to evaluate agent performance. In this approach, you define the ideal sequence of steps, tool calls, and outcomes your agent should follow as the golden path. An LLM judge then scores your agent’s actual behavior against that expected trajectory, flagging deviations that indicate errors or regressions. Agent Health measures how well your agent performs against these criteria, and using your preferred LLM provider as your judge gives you the flexibility to choose the evaluation model that fits your needs and budget.
Built for developer workflows
Agent Health runs locally on your machine, providing both a web UI (localhost:4001) and a headless CLI to support AI agent developers and ML engineers through the full development cycle of building, observing, and continuously improving their agents.
- Using CLI: Define benchmarks in JSON, run evaluations from the command line, and integrate results into CI/CD pipelines for automated quality gating.
- Using web UI: Explore results visually, design golden datasets, perform A/B testing across configurations, and export findings for reports or further analysis.
Try it yourself
Ready to see Agent Health in action? Choose your path: explore with pre-loaded sample data or connect your own agent and start evaluating.
Quickstart: Explore with sample data (no agent required)
The fastest way to experience Agent Health is using the built-in sample data. Run a single command and you’ll have mock traces, benchmarks, and evaluation results to explore immediately:
npx @opensearch-project/agent-health
# ✓ Server running at http://localhost:4001
# ✓ Demo data loaded
Navigate to Traces to explore preloaded agent execution data, go to Benchmarks to run the Travel Planning Accuracy - Demo and view LLM judge evaluations in action, and visit Compare to see side-by-side run comparisons.
Evaluate your own agent
This walkthrough shows you how to instrument your agent, create benchmarks, and iterate based on evaluation results.
Step 1: Start Agent Health
Start the tool and configure your connections:
npx @opensearch-project/agent-health
# ✓ Server running at http://localhost:4001
Agent Health needs an OpenSearch cluster for evaluation data (test cases, benchmarks, and results) and for observability data (agent traces). You can use any existing hosted OpenSearch cluster, or spin one up locally with the OpenSearch Observability Stack.
curl -fsSL https://raw.githubusercontent.com/opensearch-project/observability-stack/main/install.sh | bash
The local stack launches two components:
- OpenSearch cluster on port 9200 — Use this as both your evaluation storage and observability storage endpoints in Agent Health Settings.
- OTEL collector on port 4317 — Point your instrumented agent’s traces here. Agent Health uses OpenTelemetry for trace collection. Follow the OpenTelemetry instrumentation guide for your language to add tracing to your agent.
If you’re using an existing cluster, add your cluster endpoint directly as both storage endpoints in Settings.
In Settings, you can configure your agent endpoint (name, URL, and connector type) and configure your own LLM Judge using environment variables.
Step 2: Create a benchmark
Define test cases in JSON format. The following is an example for a travel planner agent (travel-agent-benchmark.json):
[
  {
    "name": "Check hotel availability",
    "description": "User wants to find hotels in New York for specific dates",
    "labels": ["category:Travel", "difficulty:Easy"],
    "initialPrompt": "Are there any hotels available in Manhattan for next weekend?",
    "expectedOutcomes": [
      "Agent should call search_hotels tool with location and date range",
      "Agent should present available hotels with prices and amenities"
    ]
  },
  {
    "name": "Complete booking with confirmation",
    "description": "User wants to book a specific flight and hotel",
    "labels": ["category:Travel", "difficulty:Medium"],
    "initialPrompt": "Book the morning flight to New York and the Hilton hotel for 2 nights",
    "context": [
      {
        "description": "Previous search results showing available flights and hotels",
        "value": "{\"flights\":[{\"id\":\"AA123\",\"time\":\"8:00 AM\",\"price\":\"$350\"}],\"hotels\":[{\"id\":\"hilton-manhattan\",\"name\":\"Hilton Manhattan\",\"price\":\"$200/night\"}]}"
      }
    ],
    "expectedOutcomes": [
      "Agent should call book_flight tool with the correct flight ID",
      "Agent should call book_hotel tool with hotel ID and number of nights",
      "Agent should confirm both bookings with confirmation numbers and total cost"
    ]
  }
]
Step 3: Run and analyze
To run and analyze the benchmark, use either the Agent Health CLI mode or the Agent Health UI.
Option A: Using the CLI mode
To use the CLI mode, run the following command:
npx @opensearch-project/agent-health benchmark \
  -f travel-agent-benchmark.json \
  -a travel-agent \
  --export baseline-results.json \
  -v
This command imports the benchmark, creates it, runs it against your agent, and exports results.
Option B: Using the UI
Navigate to Benchmarks, then Import JSON and select your file. Select Run and configure the agent and judge model. Watch real-time progress as each test case executes.
Step 4: View the results
You can access the results through the UI to view the overall pass rates, per-test-case results with LLM judge reasoning, and improvement strategies ranked by priority. To access the results, go to Benchmarks, then select Latest Run. Navigate to Traces for detailed execution visualization showing timeline views, flow views, and span details. Alternatively, analyze the JSON export:
cat baseline-results.json | jq '.runs[0].reports[] | select(.passFailStatus == "failed") | {
  testCase: .testCaseId,
  reasoning: .llmJudgeReasoning,
  strategies: .improvementStrategies
}'
Step 5: Iterate and improve
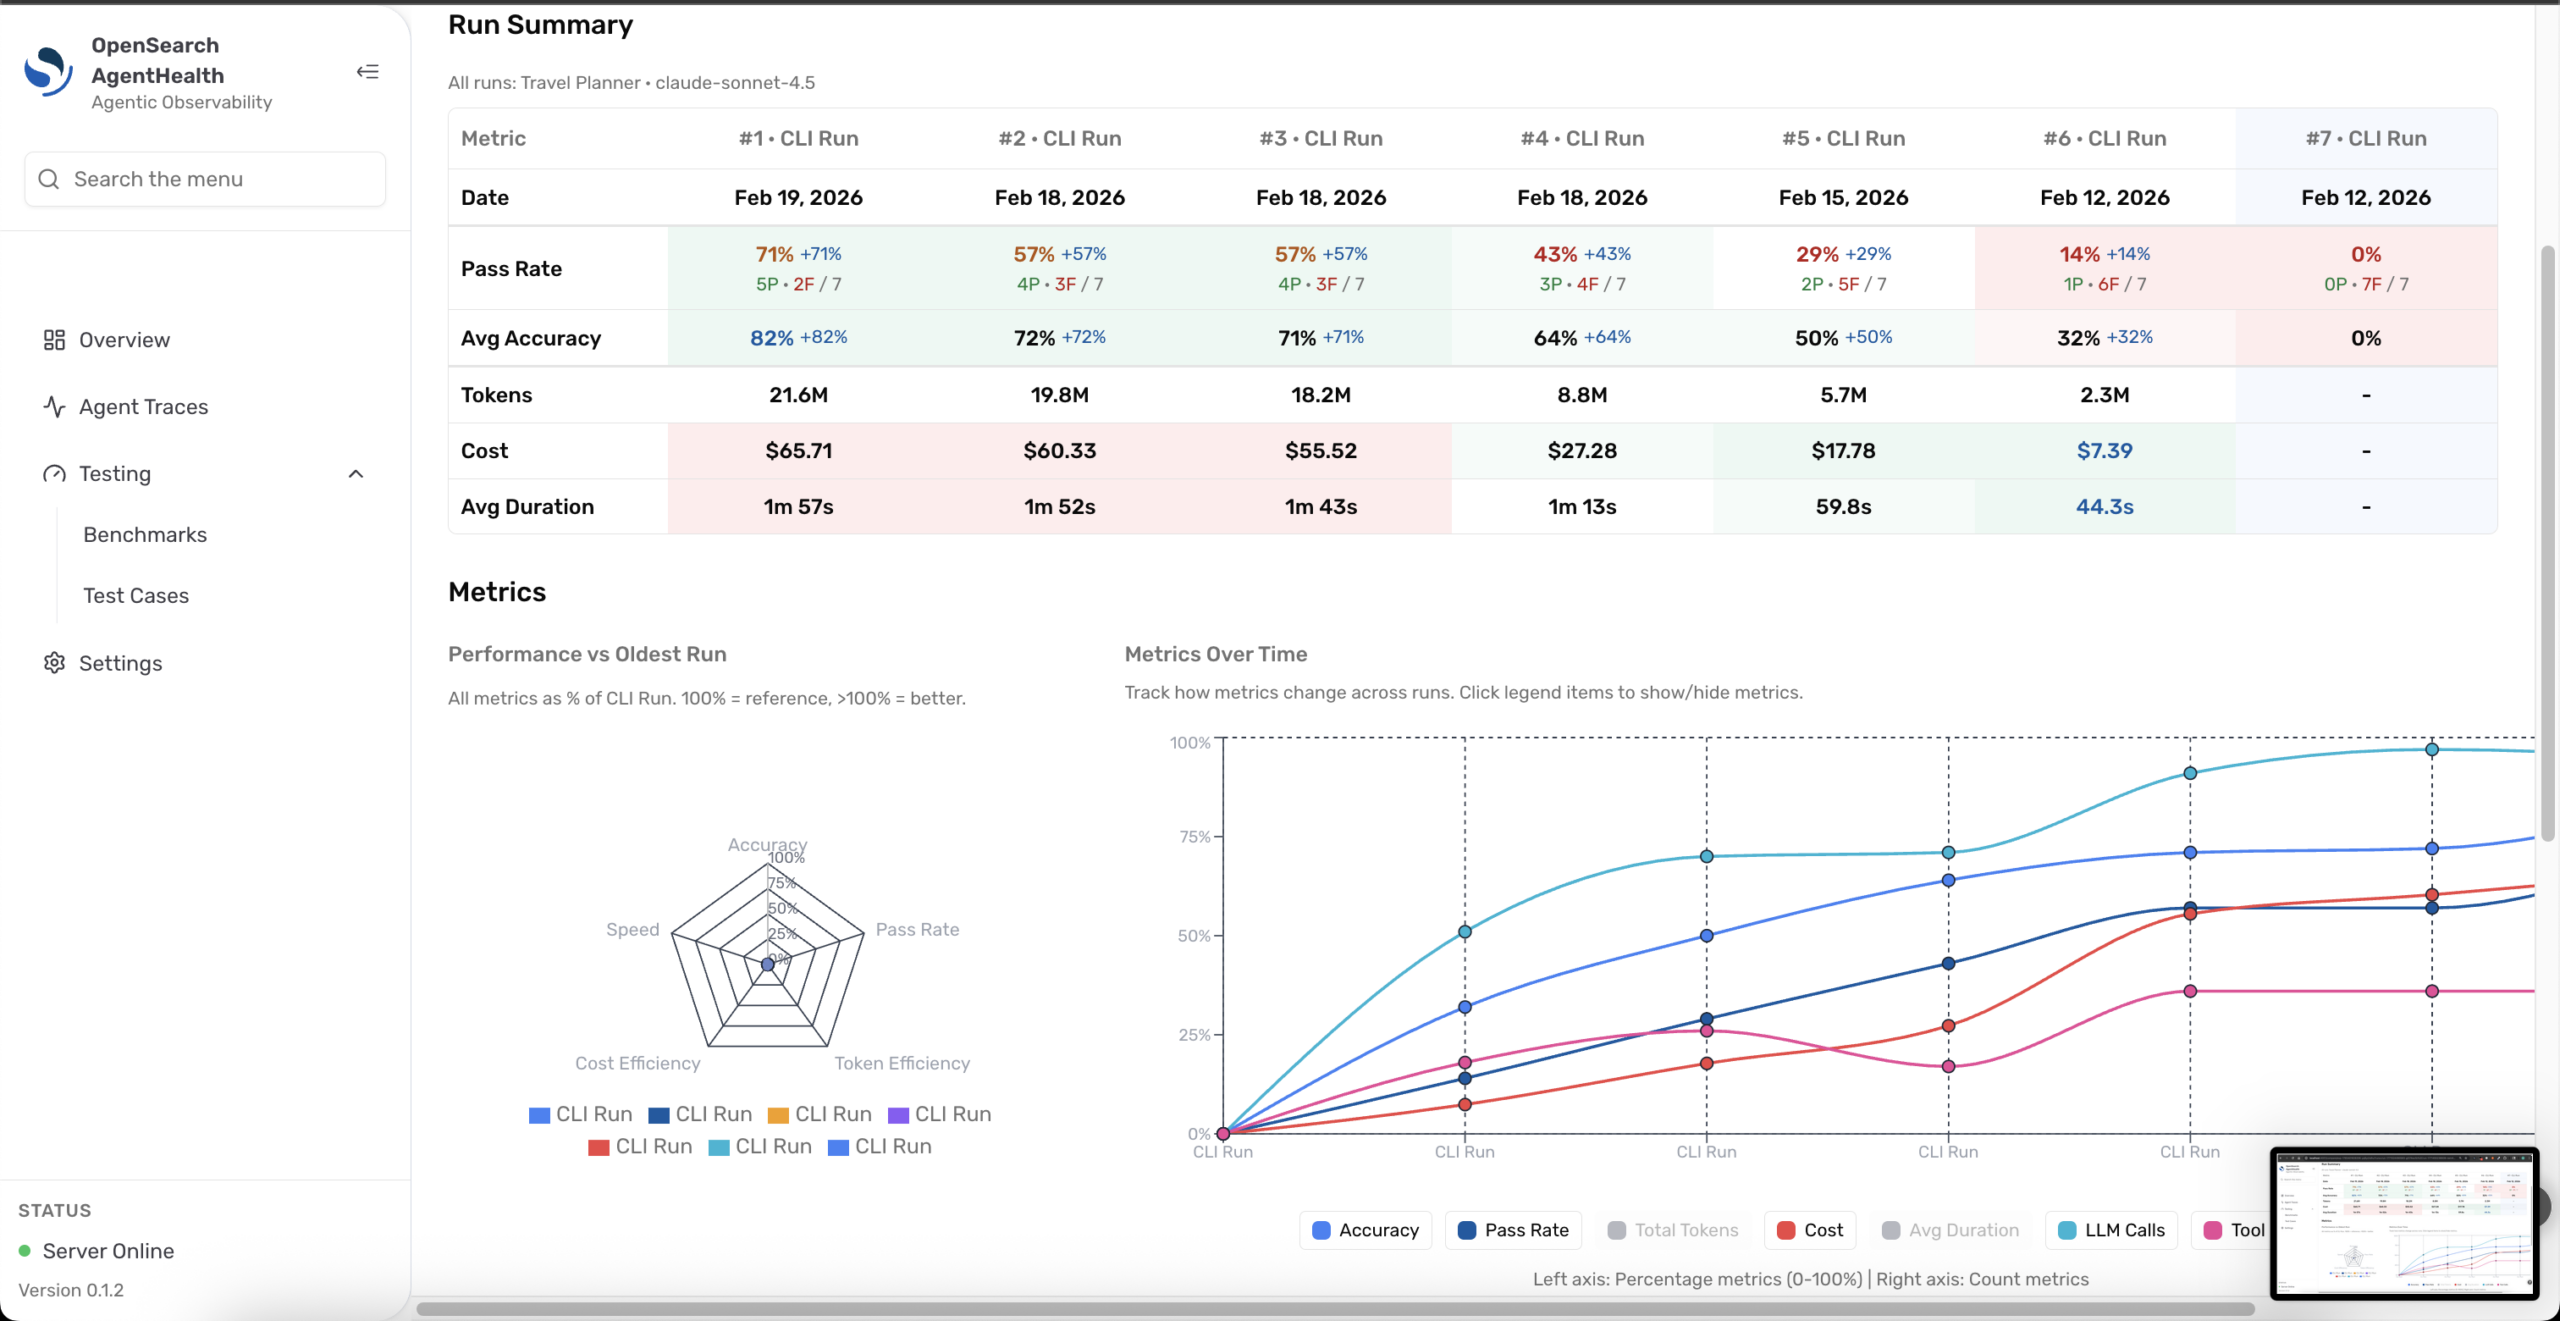
Update your agent based on high-priority recommendations, then rerun the benchmark and compare the results. Navigate to Compare from Benchmarks and select two runs to visualize improvements across metrics like pass rate, latency, cost, and failed tests, as shown in the following image.
 What’s next?
Agent Health is designed as a development-phase companion that helps you build, test, and iterate on your agents before they reach production. This is an experimental release, and we’re actively shaping the future improvements to Agent Health. As the AI agent platform matures and standards solidify, we’ll continue evolving the tool based on real-world usage and explore how Agent Health’s evaluation and observability capabilities can extend into production-scale deployments.
Install Agent Health, run your benchmarks, and share your findings. Open an issue in the repository, join the discussion in the RFC, or share your experience with the community on the OpenSearch forum. Your feedback directly influences the way we prioritize features and refine the developer experience.
Interested in an LLM evaluation platform built natively on the OpenSearch ecosystem? Check out the Agentic AI Eval Platform RFC.