
OpenSearch 3.0 introduces the plan–execute–reflect agent—a powerful new capability that breaks down complex problems, selects and executes tools autonomously, and adapts through reflection. In this post, we’ll show you how this agent automates root cause analysis in observability workflows.
Introduction
In the era of AI, agents have emerged as a powerful way to make large language models (LLMs) more practical and useful. By connecting LLMs to specific tools and capabilities, agents can transform natural language requests into concrete actions leading to meaningful results.
OpenSearch ML Commons has been at the forefront of this transformation, providing a robust agent framework that allows you to orchestrate tools and automate workflows. With OpenSearch 3.0, we’re taking a significant leap forward by introducing the plan-execute-reflect agent, designed for complex, multi-step reasoning tasks.
What’s new in OpenSearch 3.0’s agent framework?
OpenSearch 3.0 introduces an improved agent framework that enhances how you can interact with your data and address complex problems. The primary addition is a plan-execute-reflect agent designed to handle multi-step tasks methodically.
The new agent framework includes several notable improvements:
- A plan-execute-reflect agent that systematically breaks down and executes complex multi-step tasks
- Native Model Context Protocol (MCP) support for integration with external AI tools
- Enhanced tool selection and execution capabilities
- Asynchronous execution support for managing long-running tasks efficiently
In this blog post, we’ll dive into a practical observability use case that showcases the true power of this new agent framework. You’ll see firsthand how it can automatically investigate service failures in a microservices application—a typically time-consuming and complex process. You’ll see how the agent can:
- Break down a complex investigation into logical steps.
- Automatically select and use appropriate tools.
- Analyze multiple data sources (logs, traces, metrics).
- Provide clear, actionable insights.
Whether you’re managing cloud infrastructure, developing applications, or building AI-powered solutions, this new capability can help streamline your workflows and enhance your problem-solving capabilities.
Now let’s explore the capabilities and workflow of the plan-execute-reflect agent.
What is the plan-execute-reflect agent?
The plan-execute-reflect agent is a long-running agent designed for complex, multi-step tasks. This agent is capable of breaking down a complex task into a series of simple steps (plan), executing each step (execute), and optimizing its plan based on intermediate step results (reflect). It uses a separate executor agent for the execution of substeps.
Key features of this agent include the following:
- Adaptive planning that evolves based on intermediate results
- Flexibility to use different models for planning and execution phases by specifying your own executor agent during registration (uses a conversational agent by default)
- Asynchronous execution capability for handling long-running workflows in the background (when
async=true) - Built-in MCP client functionality allowing connections to multiple MCP servers
- Standardized tool communication through function calling
- Support for custom prompts, enabling specialization for specific use cases such as building an observability agent or research agent (using the WebSearchTool)
The following diagram illustrates the execution flow of the plan-execute-reflect agent.
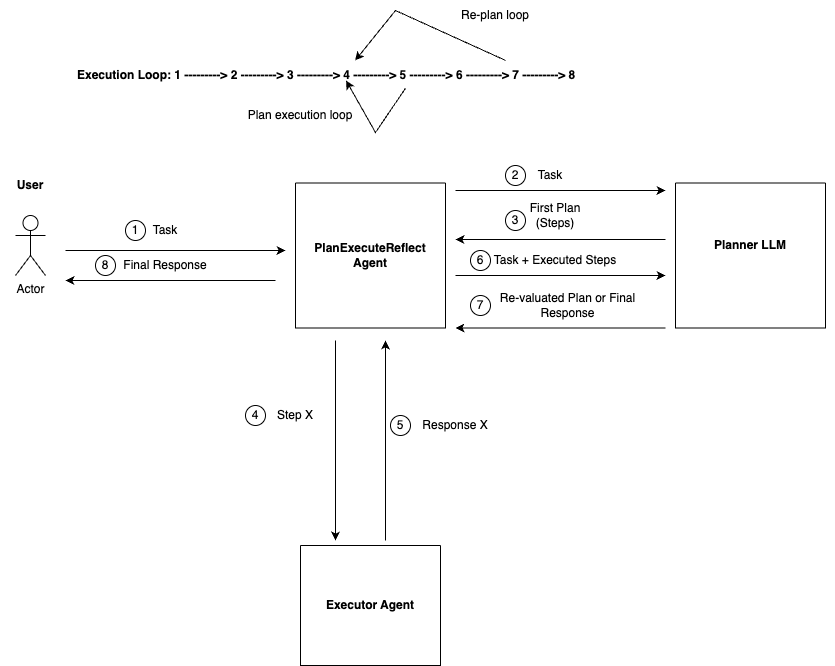
The workflow consists of the following steps:
- A user provides a task to the plan-execute-reflect agent.
- The plan-execute-reflect agent forwards the task to the planner LLM.
- The LLM returns a plan (a series of steps to execute).
- The plan-execute-reflect agent forwards the first step of the plan to the executor agent.
- The executor agent executes the steps and returns the response.
- The plan-execute-reflect agent forwards the result of the executed step and the original plan to the planner LLM.
- The planner LLM either returns the final result or a refined plan.
- If the planner LLM returns the final result, the result is returned to the user. Otherwise, the planner LLM returns a new plan and executes steps 4–7 until it has enough information to complete the task and return the result.
For additional technical details, see this issue.
Now let’s see the plan-execute-reflect agent in action by simulating a real-world scenario. We’ll walk through how it handles a practical problem by identifying an issue in a system and finding its root cause.
Simulating a real-world failure using the OpenTelemetry demo app
Modern distributed systems are complex and present significant monitoring challenges. Microservices often communicate with each other in unpredictable ways, and information about what’s happening is spread across logs, traces, and metrics. OpenSearch offers a powerful suite of observability tools, including dashboards for metrics, logs, and traces, to help you monitor and troubleshoot distributed systems. However, when debugging complex failures, you are often left manually correlating signals across services and infrastructure layers. This process is generally slow and tedious. This is where agents come in. By combining OpenSearch’s observability data with reasoning and planning capabilities, these agents can automate root cause analysis, generate actionable insights, and significantly enhance the troubleshooting experience.
We’ll demonstrate how to use the plan-execute-reflect agent to build an observability agent capable of root-causing an issue in a microservices application. We’ll show you how to register the agent, run a task, and interpret the output, using natural language input with minimal setup.
We’ll simulate a failure in a microservices environment: a cart failure in an e-commerce application. For this, we’ll use the OpenTelemetry demo application, a reference application that mimics a real-world system.
This application emits telemetry data, including logs, traces, and metrics, to OpenSearch, giving us rich observability signals. We’ll trigger a cart failure and then ask our observability agent to diagnose the root cause using these signals.
For more information about the demo application, see OpenTelemetry-Demo.
Triggering a cart failure
The OpenTelemetry Demo uses flagd, a simple feature flag service, to manage built-in fault scenarios. You can toggle flag values using a web UI or by editing the demo’s configuration file directly. To simulate a cart failure, perform the following steps:
- Deploy the OpenTelemetry Demo application and navigate to the feature flag dashboard at http://localhost:8080/feature.
- Find cartFailure, toggle it to the On position, and then select Save.
- To access the cart, go to http://localhost:8080/cart. Once the flag is enabled, the Empty Cart button in the frontend UI will stop working.
- To generate the error condition, add at least one item to your shopping cart and then select the Empty Cart button.
The operation will fail, triggering error spans and logs in OpenSearch corresponding to the Cart Service failure.
With the cart failure now active, the demo application will emit error-level spans and log entries for the Cart Service. These signals form the basis of our root cause analysis.
Investigating the issue using an observability agent
Let’s now try to identify the root cause of this issue using OpenSearch’s new plan-execute-reflect agent. Instead of manually querying logs or sifting through traces, we’ll describe the problem to the agent and let it perform the investigation. Let’s set up the agent using the following steps.
For more information about the agent, see Plan-execute-reflect agent.
Step 1: Register the LLM
Register the LLM to be used with the agent. In this example, we will use a Claude 3.7 Sonnet model deployed on Amazon Bedrock.
For more information about connecting your LLM to the agent, see Connecting to LLMs.
Step 1.1: Register the connector
POST /_plugins/_ml/connectors/_create
{
    "name": "BedRock Claude 3.7-sonnet connector",
    "description": "Connector to Bedrock service for claude model",
    "version": 1,
    "protocol": "aws_sigv4",
    "parameters": {
      "region": "your_aws_region",
      "service_name": "bedrock",
      "model": "us.anthropic.claude-3-7-sonnet-20250219-v1:0"
    },
    "credential": {
      "access_key": "your_aws_access_key",
      "secret_key": "your_aws_secret_key",
      "session_token": "your_aws_session_token"
    },
    "actions": [
      {
        "action_type": "predict",
        "method": "POST",
        "url": "https://bedrock-runtime.${parameters.region}.amazonaws.com/model/${parameters.model}/converse",
        "headers": {
          "content-type": "application/json"
        },
        "request_body": "{ \"system\": [{\"text\": \"${parameters.system_prompt}\"}], \"messages\": [${parameters._chat_history:-}{\"role\":\"user\",\"content\":[{\"text\":\"${parameters.prompt}\"}]}${parameters._interactions:-}]${parameters.tool_configs:-} }"
      }
    ]
}
Note the connector ID; you’ll use it to register the model.
Step 1.2: Register the model
POST /_plugins/_ml/models/_register
{
    "name": "Bedrock Claude Sonnet model",
    "function_name": "remote",
    "description": "Bedrock Claude 3.7 sonnet model for Plan, Execute and Reflect Agent",
    "connector_id": "your_connector_id"
}
Note the model ID; you’ll use to register the agent.
Step 2: Register the agent
POST _plugins/_ml/agents/_register
{
  "name": "My Plan Execute and Reflect agent with Claude 3.7",
  "type": "plan_execute_and_reflect",
  "description": "this is a test agent",
  "llm": {
    "model_id": "your_llm_model_id",
    "parameters": {
      "prompt": "${parameters.question}"
  }},
  "memory": {
    "type": "conversation_index"
  },
  "parameters": {
    "_llm_interface": "bedrock/converse/claude"
  },
  "tools": [
    {
      "type": "ListIndexTool"
    },
    {
      "type": "SearchIndexTool"
    },
    {
      "type": "IndexMappingTool"
    }
  ],
}
Note the agent ID; you’ll use it to execute the agent.
Step 3: Execute the agent
OpenSearch 3.0 introduces the ability to execute agents asynchronously. Because this agent is long running, let’s execute it asynchronously by providing the async=true query parameter:
POST /_plugins/_ml/agents/your_agent_id/_execute?async=true
{
  "parameters": {
    "question": "My users are complaining about the cart service. It is showing some unexpected behavior. When I click on empty cart it doesn't do anything. Can you investigate the root cause of this? There are spans and logs you can use to conduct your investigation."
  }
}
OpenSearch responds with the task information:
{
  "task_id": "waIQmJYBJr85UikuxTKC",
  "status": "RUNNING",
  "response": {
    "memory_id": "v6IQmJYBJr85UikuxTJN"
  }
}
Step 4: Analyze the results
Let’s check the status of the task by querying the tasks endpoint:
GET _plugins/_ml/tasks/your_task_id
{
  "task_type": "AGENT_EXECUTION",
  "function_name": "AGENT",
  "state": "COMPLETED",
  "worker_node": [
    "q5yAqa75RM-rv0I67V1VVQ"
  ],
  "create_time": 1746148548710,
  "last_update_time": 1746148706345,
  "is_async": false,
  "response": {
    "memory_id": "bzWQjpYBKhItn1nNYHtu",
    "inference_results": [
      {
        "output": [
          {
            "result": "bzWQjpYBKhItn1nNYHtu",
            "name": "memory_id"
          },
          {
            "result": "cDWQjpYBKhItn1nNYHuS",
            "name": "parent_interaction_id"
          },
          {
            "result": "dTWQjpYBKhItn1nNbHsw",
            "name": "executor_agent_memory_id"
          },
          {
            "result": "YjWQjpYBKhItn1nN6oYk",
            "name": "executor_agent_parent_interaction_id"
          },
          {
            "name": "response",
            "dataAsMap": {
              "response": """After a comprehensive investigation of the cart service issues, I have identified the root cause of the 'empty cart' functionality failure.

# Root Cause Analysis

## Problem Identification
Users reported that clicking on 'empty cart' doesn't do anything. This was confirmed through analysis of OpenTelemetry traces showing failures in the `/oteldemo.CartService/EmptyCart` gRPC method.

## Key Findings

1. **Redis Connection Failures**:
   - Error message: \"Wasn't able to connect to redis\"
   - Component: `cart.cartstore.ValkeyCartStore`
   - Multiple occurrences between 15:56 and 16:00 on April 18, 2025

2. **EmptyCart Operation Failures**:
   - Method: `/oteldemo.CartService/EmptyCart`
   - Status Code: ERROR (2)
   - Error Message: \"Error emptying cart\"
   - HTTP Status Code: 500 (Internal Server Error)
   - These failures occurred in the same time window as the Redis connection errors

3. **Correlation Evidence**:
   - The timing of EmptyCart failures perfectly aligns with Redis connection errors
   - All failures affect the same cart service instance (container ID: `2e6e7f69cca2`)
   - Read operations (`GetCart`) sometimes succeeded while write operations (`EmptyCart`) consistently failed

## Conclusion

The root cause of the 'empty cart' functionality failure is a Redis connection issue in the cart service. The cart service uses Redis as its backend storage for maintaining cart state. When Redis becomes unavailable, the cart service can't perform write operations like emptying a cart.

Interestingly, some read operations (GetCart) were still succeeding, likely due to caching or different error handling for read vs. write operations, but all EmptyCart operations failed with a 500 error due to the inability to connect to Redis.

## Recommended Action

To resolve this issue:
1. Restore the Redis connection for the cart service
2. Investigate why the Redis connection was lost
3. Consider implementing better error handling in the cart service for Redis connection failures
4. Add better user feedback when backend operations fail"""
            }
          }
        ]
      }
    ]
  }
}
The agent identifies that the root cause of the problem is a Redis connection issue. It highlights repeated failures to connect to the Redis backend, visible in the service logs and traces, and links to specific log entries showing ECONNREFUSED errors. The response also includes a step-by-step explanation of how the agent analyzed the traces and logs to identify the failure. By automating root cause analysis, the agent effectively reduces the time spent on manual troubleshooting, showcasing how it can resolve complex issues and empower teams to quickly find solutions.
Let’s validate the results by querying the logs:
GET ss4o_logs-*/_search
{
  "size": 10,
  "sort": [
    { "time": { "order": "desc" } }
  ],
  "query": {
    "bool": {
      "must": [
        { "match": { "serviceName": "cart" } }
      ],
      "should": [
        { "term": { "severityText.keyword": "Error" } },
        { "wildcard": { "body.keyword": "*Error*" } }
      ],
      "minimum_should_match": 1
    }
  }
}
The response clearly points to a Redis connection issue as the root cause:
{
    "_index": "ss4o_logs-2025.05.03",
    "_id": "jKd4mJYBJr85Uiku-gbe",
    "_score": null,
    "_source": {
        "traceId": "2d45e1cde4f8645b36ab31c07e2e67d6",
        "spanId": "e29428cdfabb1c30",
        "severityText": "Error",
        "flags": 1,
        "time": "2025-05-03T23:26:20.084598400Z",
        "severityNumber": 17,
        "droppedAttributesCount": 0,
        "serviceName": "cart",
        "body": "Wasn't able to connect to redis",
        "observedTime": "2025-05-03T23:26:20.084598400Z",
        "schemaUrl": "",
        "instrumentationScope.name": "cart.cartstore.ValkeyCartStore",
        "resource.attributes.service@version": "2.0.2",
        "resource.attributes.telemetry@sdk@name": "opentelemetry",
        "resource.attributes.telemetry@sdk@language": "dotnet",
        "resource.attributes.host@name": "7cbfd02de5b9",
        "resource.attributes.service@namespace": "opentelemetry-demo",
        "resource.attributes.container@id": "7cbfd02de5b9886dcda65e9876ee4d9601c98b29efada503117f3ac187a3b81a",
        "resource.attributes.telemetry@sdk@version": "1.11.2",
        "resource.attributes.service@name": "cart"
    }
},
{
    "_index": "ss4o_logs-2025.05.03",
    "_id": "nqd4mJYBJr85Uiku-gbe",
    "_score": null,
    "_source": {
        "traceId": "2d45e1cde4f8645b36ab31c07e2e67d6",
        "spanId": "e29428cdfabb1c30",
        "severityText": "Information",
        "flags": 1,
        "time": "2025-05-03T23:26:20.084929Z",
        "severityNumber": 9,
        "droppedAttributesCount": 0,
        "serviceName": "cart",
        "body": "Error status code '{StatusCode}' with detail '{Detail}' raised.",
        "observedTime": "2025-05-03T23:26:20.084929Z",
        "schemaUrl": "",
        "instrumentationScope.name": "Grpc.AspNetCore.Server.ServerCallHandler",
        "log.attributes.Detail": """Can't access cart storage. System.ApplicationException: Wasn't able to connect to redis
at cart.cartstore.ValkeyCartStore.EnsureRedisConnected() in /usr/src/app/src/cartstore/ValkeyCartStore.cs:line 95
at cart.cartstore.ValkeyCartStore.EmptyCartAsync(String userId) in /usr/src/app/src/cartstore/ValkeyCartStore.cs:line 178""",
        "resource.attributes.service@version": "2.0.2",
        "resource.attributes.telemetry@sdk@name": "opentelemetry",
        "resource.attributes.telemetry@sdk@language": "dotnet",
        "resource.attributes.host@name": "7cbfd02de5b9",
        "resource.attributes.service@namespace": "opentelemetry-demo",
        "resource.attributes.container@id": "7cbfd02de5b9886dcda65e9876ee4d9601c98b29efada503117f3ac187a3b81a",
        "resource.attributes.telemetry@sdk@version": "1.11.2",
        "resource.attributes.service@name": "cart",
        "log.attributes.StatusCode": "FailedPrecondition"
    }
}
For more information about agent registration and execution, see this tutorial.
If you want to see the intermediate results, you can query the memory index and memory traces to understand the interactions between the agent and the LLM:
GET /_plugins/_ml/memory/message/your_message_id/traces
For more information about memory and traces, see Memory APIs.
Extending the agent with more tools and MCP support
The power of the plan-execute-reflect agent lies in its flexibility. While our example uses a basic set of tools to investigate a cart failure, the agent can support a wide range of tools. For the list of available tools, see Tools.
One such example would be using the WebSearchTool to perform deep-research tasks.
Additionally, this agent functions as an MCP client, enabling it to connect to MCP servers. This capability allows the agent to dynamically retrieve tools and configurations and participate in more complex workflows.
To learn how too connect your agent to an MCP server, see Connecting to an external MCP server.
Recommendations and troubleshooting
- If you notice your model throttling your agent, enable retries using the connector configuration.
- If the agent stops after executing
max_stepssteps, increase themax_stepsvalue or specify it during execution in theparameters.max_stepsfield.
Future enhancements
The plan-execute-reflect agent is currently an experimental feature. We are planning to continue evolving it with these potential future enhancements:
- Parallel tool execution
- Multiple reflection strategies
- Human-in-the-loop
- Ability to cancel a running task
- Agent execution checkpointing
For updates on the progress of the feature or if you want to leave feedback, see the associated GitHub issue.
Conclusion
In this tutorial, we showed you how to use the plan-execute-reflect agent to troubleshoot and identify the root cause of a cart failure in the OpenTelemetry demo application. By breaking down a high-level task into smaller steps and executing them iteratively, the agent provides a powerful and flexible way to automate complex reasoning workflows. This approach is particularly useful for observability and operational intelligence use cases where multi-step diagnosis is needed.
The plan-execute-reflect agent demonstrates how intelligent automation can simplify root cause analysis. By combining OpenTelemetry observability data with LLM-based reasoning, OpenSearch can now assist you in debugging complex, multi-service systems with just a single prompt.
Want to try it yourself? Check out this tutorial and deploy the agent in your own stack.