Taking the leap, not the plunge
Personally, I’ve always wanted to contribute to an open-source project, but never found a way to incorporate it with my day-to-day work. Occasionally, I’d muster up the courage to clone a project I liked, seeking a good entry point to add some new feature or handle some issue. I thought that all I needed was to make a small contribution and everything else would just flow into place.
Turns out, this may be true for small-scale projects, but for complex ones like OpenSearch this isn’t the case. While you may fix a minor bug, you’re not likely to know where to begin in order to fix a moderate bug or design a new feature. Searching for that entry point via the main() entrance mostly feels like wandering around an M.C. Escher print.
However, some projects have an entrance unlike any other – a Pluggable Architecture.
A pluggable architecture enables us to have a hands on experience with a logical sub section of a large-scale project. This effect makes such an immense project more approachable despite its overall size.
In this blog post, I will take you on a journey through my thought process and conclusions from building my first OpenSearch plugin. We will build a simple REST plugin together, install it into OpenSearch, and run it. By the end, I hope to convince you that it is a great starting point for you gaining hands-on experience required for joining the OpenSearch community of contributors, and a great starting point for the project itself.
- My First Steps in OpenSearch Plugins
- Building a Simple OpenSearch REST Plugin
- Trying out our new plugin
- Key takeaways from creating my first plugin
What are OpenSearch Plugins?
Software plugins are, in essence, standalone components that add features and capabilities to an existing core program.
Normally, when viewing a plugin’s code you wouldn’t see any point of entry (no main()). That’s because the plugin’s points of entry are the interface functions that it implements.
OpenSearch plugins are no different.
As an analogy, think of how you can replace lenses and flash elements on a camera body. The core project is the part that takes the picture. It contains things a camera must have such as a light sensor and the software required to record the sensor’s information. Plugins then would be what you can connect to the camera body.
Take for example, a wide angle lens to take pictures of landscapes. Maybe a cool feature would be to keep the camera still without touching it? Or taking it under water? You could install a tripod or a protective waterproof case respectively. Consider also that these plugins connect to the camera body in some way. To create one yourself you must first know 1) how to connect to the camera, and 2) how to interact with it via these connections – this is called the plugin interface.
If you are designing a way for the camera to store more images on a new form of memory chip, then you don’t need to know anything about the interface of the lenses. However, you would have to know a great deal about how this camera sends/retrieves its recorded file via the memory chip connectors.
In other words, the plugin interface is not necessarily the same for every plugin.
The beauty of this architecture is that it enables you to customize the core program to your needs, without having to contribute to the core project directly (Imagine having to buy a new camera for every different lens instead of switching the lenses!).
Let’s get back to OpenSearch plugins:
Some plugins, for historic reasons, reside in the core project. An example of one of these is the repository-s3 plugin that implements snapshot and restore capabilities using AWS’s S3 buckets as the repository.
They are in the open-source project repository. However, when we create the binaries of the OpenSearch project (~ gradle build) these plugins are not installed. This is by design – ensuring the release artifact is not huge by default.
Ideally, the OpenSearch project would be pluggable but contain no plugins in the project itself.
As mentioned previously, an important characteristic of a pluggable architecture is the plugin interface. This interface needs 1) to be as stable as possible and 2) to strive to be backwards-compatible throughout the different project versions. Otherwise, existing plugins will be very hard to maintain. This is similar to maintaining a public API.
This brings us to the plugins built by the community and completely independent of the main project. The ability to add plugins offers some key benefits to the open source community:
- Adding new features to OpenSearch can be done independently of the core project – it allows for a wide range of features to be developed with few (if any) conflicts in the code.
- Writing a plugin for OpenSearch requires going through the core project’s source code. By creating plugins, you are gaining the skills to be part of the OpenSearch community.
OpenSearch plugins vary greatly in complexity and functionality, yet they all have common characteristics. Let’s get to know them by creating a simple REST plugin – a plugin that implements a new REST endpoint in the OpenSearch project, reachable via an HTTP call to the running cluster.
Building a Simple OpenSearch REST Plugin
Before we start – make sure you have these environment dependencies
- Java 14
- Gradle 7.0+
(don’t forget to add them to$JAVA_HOMEand$PATH)
Defining Our Plugin Requirements for OpenSearch
Let’s say we would like to add a new endpoint to OpenSearch called _plugins/hello_world with the following behavior:
➜  ~ curl -XGET 'localhost:9200/_plugins/hello_world'

        Hi! Your plugin is installed and working:)

➜  ~ curl -XPOST 'localhost:9200/_plugins/hello_world' -H 'Content-Type: application/json' -d '{"name":"Amitai"}'

        Hi Amitai! Your plugin is installed and working:)
That is all we should start with. Anything more ambitious would keep us from focusing on the basics of plugins.
I am going to be writing the plugin using the plugin writing conventions suggested in the OpenSearch project’s opensearch-plugins repo.
To get started, create a new gradle project. Then, add the following directories and files, which we will edit along the way. (Alternatively you can clone the complete source code for this plugin here)
.
|-- LICENSE.txt
|-- NOTICE.txt
|-- build.gradle
`-- src
    |-- main
    |   `-- java
    |       `-- org
    |           `-- opensearch
    |               `-- rest
    |                   `-- action
    |                       |-- HelloWorldPlugin.java
    |                       |-- HelloWorldService.java
    |                       `-- RestHelloWorldAction.java
    |-- test
    |   `-- java
    |       `-- org
    |           `-- opensearch
    |               `-- rest
    |                   `-- action
    |                       `-- HelloWorldPluginTests.java
    `-- yamlRestTest
        |-- java
        |   `-- org
        |       `-- opensearch
        |           `-- rest
        |               `-- action
        |                   `-- HelloWorldClientYamlTestSuiteIT.java
        `-- resources
            `-- rest-api-spec
                |-- api
                |   `-- _plugins.hello_world.json
                `-- test
                    `-- _plugins.hello_world
                        |-- 10_basic.yml
                        `-- 20_hello_world.yml
The build.gradle of Our Plugin
All OpenSearch plugins have the same general structure. The plugin itself is a zip file that contains at the root:
- The plugin
jarfiles plugin-descriptor.properties- [OPTIONAL]
bindirectory - [OPTIONAL]
configdirectory - [OPTIONAL]
plugin-security.policy
Any resources a plugin requires are packaged into a resources
jar. This is due to the fact that onlyjarfiles at the root are added to the classpath for the plugin.
The build.gradle file will build this structure for us when we are done, including creating the required plugin-descriptor.properties.
However, since we need the OpenSearch project artifact for the gradle build process and the plugin interface, let’s clone the project and publish it to our Maven local. This last step is required since the artifact is not yet published to public repositories.
In this example I will be using release version 1.0.0-beta1, as described here:
➜  ~ git clone https://github.com/opensearch-project/OpenSearch.git
➜  ~ cd OpenSearch
➜  OpenSearch git:(main) git checkout 1.0.0-beta1 -b beta1-release
➜  OpenSearch git:(beta1-release) ./gradlew publishToMavenLocal -Dbuild.version_qualifier=beta1 -Dbuild.snapshot=false
Copy the following to the build.gradle file:
apply plugin: 'java'
apply plugin: 'opensearch.opensearchplugin'
apply plugin: 'opensearch.yaml-rest-test'

opensearchplugin {
    name 'opensearch-rest-plugin'
    description 'Custom OpenSearch REST plugin for educational purposes'
    classname 'org.opensearch.rest.action.HelloWorldPlugin'
    licenseFile rootProject.file('LICENSE.txt')
    noticeFile rootProject.file('NOTICE.txt')
}

buildscript {
    repositories {
        mavenCentral()
        mavenLocal()
    }

    dependencies {
        classpath "org.opensearch.gradle:build-tools:1.0.0-beta1"
    }
}

repositories {
    mavenLocal()
}

// disabling some unnecessary validations for this plugin
testingConventions.enabled = false
loggerUsageCheck.enabled = false
validateNebulaPom.enabled = false

dependencies {
    // required for the yaml test to run
    yamlRestTestImplementation 'org.apache.logging.log4j:log4j-core:2.11.1'
}
A few things to note on the build.gradle:
opensearchpluginsection:- Every plugin must contain a file called
plugin-descriptor.propertieswhich contains some optional fields and some mandatory. In my example I included the mandatory ones only. You must provide: the full class path to the plugin file in your project (classname), the plugin name (opensearch-rest-plugin) and description, and the locations of your plugin’s license and notice files. - This section ensures that this file will be created in the plugin’s build process using the properties provided in the curly braces.
- Every plugin must contain a file called
org.opensearch.gradle:build-tools:1.0.0-beta1- The version at the end in this example is
1.0.0-beta1, the version must match the version of the OpenSearch project we are going to install our plugin into. We are getting this artifact from our local maven repo.
- The version at the end in this example is
LICENSE.txtandNOTICE.txtfiles:- These pertain to your plugin, and not to the core project.
- An example for the License and Notice files if you’re interested in the Apache 2.0 license:
Example for Notice.txt:
This product includes software developed by The Apache Software
Foundation (https://www.apache.org/).
And a copy of the Apache 2.0 license can be found here. Add your plugin’s license and notice .txt files to your project and edit them later:
➜  opensearch-rest-plugin touch "./LICENSE.txt"
➜  opensearch-rest-plugin touch "./NOTICE.txt"
I am not a lawyer. If you’re not sure what to put in the
LICENSE.txtandNOTICE.txtfiles, please consult one.
Implementing the Plugin Code
We are going to add the plugin under /src/main/java/org/opensearch/rest/action.
This is not an arbitrary directory! During the plugin installation your source code will be copied to this directory in the OpenSearch project, so you must select the relevant path depending on the type of plugin (more on this in a bit).
Open the project in your favorite IDE, and edit HelloWorldPlugin.java:
/*
 * SPDX-License-Identifier: Apache-2.0
 *
 * The OpenSearch Contributors require contributions made to
 * this file be licensed under the Apache-2.0 license or a
 * compatible open source license.
 */
package org.opensearch.rest.action;

import ...

public class HelloWorldPlugin extends Plugin implements ActionPlugin {

    @Override
    public List<RestHandler> getRestHandlers(final Settings settings,
                                             final RestController restController,
                                             final ClusterSettings clusterSettings,
                                             final IndexScopedSettings indexScopedSettings,
                                             final SettingsFilter settingsFilter,
                                             final IndexNameExpressionResolver indexNameExpressionResolver,
                                             final Supplier<DiscoveryNodes> nodesInCluster) {

        return singletonList(new RestHelloWorldAction());
    }
}
Notice we are extending Plugin and implementing the ActionPlugin. How did I reach the conclusion that I need to implement this particular interface?
This is where we need to learn a little bit about the project we are plugging into.
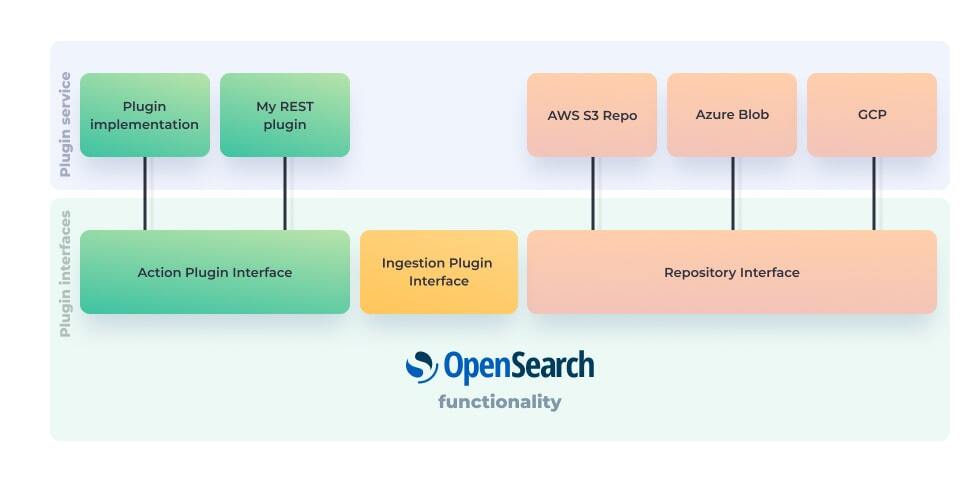
OpenSearch Plugin Interfaces
When creating a plugin we would want to implement at least one plugin interface class. For our simple example it seems we need a REST layer, so one interface should do. These are the current plugin interfaces available, found at the plugins folder in the OpenSearch project:
- ActionPlugin – Simply put, actions are things you can do over the API. This interface allows for extentind the REST API.
- AnalysisPlugin – Extends analysis functionality (i.e. tokenizer’s and char filters) on the index level.
- ClusterPlugin – Extends the cluster management behavior, such as shard allocation.
- DiscoveryPlugin – Extends OpenSearch’s host discovery functionality.
- EnginePlugin – For providing alternative engine implementations. This is used when a new index is created and affects how we read/write to that index.
- ExtensiblePlugin – Provides a callback for extensible plugins to be informed of other plugins which extend them.
- IndexStorePlugin – Provides alternative directory implementations (for the data being indexed).
- IngestPlugin – A powerful tool! You can use it to add custom ingest processors that are applied to the docs when they are ingested into OpenSearch.
- MapperPlugin – Extend this to add custom mappers.
- NetworkPlugin – Plugin for extending network and transport related classes. This interface is used on the transport layer between nodes.
- PersistentTaskPlugin – Plugin for registering persistent tasks executors.
- ReloadablePlugin – Plugins usually implement this interface in order to allow a plugin to reload its state.
- RepositoryPlugin – An interface for adding custom snapshot and restore repository implementations.
- ScriptPlugin – Extends the scripting functionality.
- SearchPlugin – Plugin for extending search time behavior (Aggregations, scoring, ).
- SystemIndexPlugin – Plugin for defining system indices.
So, I wanted to find which of these is the right one for adding a REST call. Simply reading the javadoc of the classes is not always as forthcoming as you would expect. Check out the description over the ActionPlugin:
An additional extension point for {@link Plugin}s that extends OpenSearch’s scripting functionality.
Instead, the best way to know which plugin interface to implement is to follow a similar flow in the project. Off the top of your head, what is the most simple REST call you send to OpenSearch?
For me it is the /_cat endpoint. So I set out to understand the flow of a simple endpoint that I am familiar with. Searching the OpenSearch project for "/_cat" led me to a file called RestCatAction. Look at the files around this one, can you see that there is a naming convention/template?
Rest+ specific function +Action
So a new endpoint like the one we wish to create would have to be in this path (now you know why i chose org/opensearch/rest/action), and have a name like RestHelloWorldAction. We will edit it later on.
Next, I wanted to know how OpenSearch registers all these routes? How would my plugin’s new endpoint be properly exposed? If you search for usages of the RestCatAction you will get to the ActionModule. This class has a method called initRestHandlers() which does exactly what I was looking for. If registering REST handlers is done here it stands to reason that REST handling for plugins is also done here. Simply searching for the word "plugin" led me to this block of code in the initRestHandlers() function:
        for (ActionPlugin plugin : actionPlugins) {
            for (RestHandler handler : plugin.getRestHandlers(settings, restController, clusterSettings, indexScopedSettings,
                    settingsFilter, indexNameExpressionResolver, nodesInCluster)) {
                registerHandler.accept(handler);
            }
        }
And there you have it! ActionPlugin’s have a function getRestHandlers() that returns the plugin REST handler of type RestHandler.
In conclusion:
- We know we need to implement an
ActionPlugininterface in order to be registered during the node startup. - Our plugin needs to supply a
RestHandlertype of class. This means the new class we added (RestHelloWorldAction) should extend theRestHandlerclass.
Implementing Plugin logic
Noticing that the majority of the REST action handlers are extending the BaseRestHandler which in turn extends the RestHandler led me to edit the RestHelloWorldAction.java file like this:
/*...*/
package org.opensearch.rest.action;

import ...

public class RestHelloWorldAction extends BaseRestHandler {
    @Override
    public String getName() {
        return "rest_handler_hello_world";
    }

    @Override
    public List<Route> routes() {
        return unmodifiableList(asList(
                new Route(GET, "/_plugins/hello_world"),
                new Route(POST, "/_plugins/hello_world")));
    }

    @Override
    protected RestChannelConsumer prepareRequest(RestRequest request, NodeClient client) throws IOException {
        String name = request.hasContent()? request.contentParser().mapStrings().get("name"): "";

        return channel -> {
            try {
                channel.sendResponse(HelloWorldService.buildResponse(name));
            } catch (final Exception e) {
                channel.sendResponse(new BytesRestResponse(channel, e));
            }
        };
    }
}
This implementation adds the routes we defined earlier. It also prepares the request for handling.
The incoming request first lands on the REST layer and is handled later (async) by an event loop. The request is processed into the tcp layer and then the response is sent back via the REST layer. This is, of course, an oversimplification of how actions are handled in OpenSearch.
if this asynchronous behavior and the way nodes communicate is a subject you would like to hear more about please let me know in the comments!
Logic separation
Please note that I am adding a new class called HelloWorldService to implement the logic. It would be wrong in this case to handle the logic at the time the endpoint is called rather than when the system is ready to handle the request. This separation also allows us to test the plugin logic and the integration of the new route separately.
That’s what the HelloWorldService class is for – We could edit the class to be something like this:
/*...*/
package org.opensearch.rest.action;

import ...

public class HelloWorldService {

    public static RestResponse buildResponse(String name) {
        String space = name.isEmpty()? "" : " ";
        final String message = "Hi" + space + name + "! Your plugin is installed and working:)";
        return new BytesRestResponse(RestStatus.OK, message);
    }
}
Testing
OpenSearch offers test cases for you to extend, that give you the ability to have common cluster configurations for many tests. Some of these offer a way to test your plugin as part of an OpenSearch instance. In order to test the integration with our new endpoint we can implement a YAML test. This type of test is recommended by the documentation for REST tests.
In order to run a YAML REST test we need to provide a resource containing the REST API spec adhering to the api spec requirements, and the YAML based tests describing the actions and the expected returned values.
As previously described, the YAML REST test file structure should be like this:
-- src
    |
    `-- yamlRestTest
        |-- java
        |   `-- org
        |       `-- opensearch
        |           `-- rest
        |               `-- action
        |                   `-- HelloWorldClientYamlTestSuiteIT.java
        `-- resources
            `-- rest-api-spec
                |-- api
                |   `-- _plugins.hello_world.json
                `-- test
                    `-- _plugins.hello_world
                        |-- 10_basic.yml
                        `-- 20_hello_world.yml
The 10_basic.yml will test that the plugin has been added, the other tests check if the rest endpoint is working as expected. We can now edit the _plugins.hello_world.json to describe the new REST endpoint’s behaviour:
{
  "_plugins.hello_world": {
    "stability" : "stable",
    "url": {
      "paths": [
        {
          "path": "/_plugins/hello_world",
          "methods": [
            "GET",
            "POST"
          ]
        }
      ]
    },
    "body": {
      "description": "The name to be included in the hello message"
    }
  }
}
And now the YAML tests themselves:
10_basic.yml
"Test that the plugin is loaded in OpenSearch":
  - do:
      cat.plugins:
        local: true
        h: component

  - match:
      $body: /^opensearch-rest-plugin\n$/
20_hello_world.yml
---
"Default with no name":
  - do:
      _plugins.hello_world: {}

  - match: {$body: "Hi! Your plugin is installed and working:)" }

---
"With name":
  - do:
      _plugins.hello_world:
        body:
          name: Amitai

  - match: {$body: "Hi Amitai! Your plugin is installed and working:)" }
The only thing we are missing is to edit the HelloWorldClientYamlTestSuiteIT.java file. When this file is run it runs the YAML cases we defined using a client against a running OpenSearch cluster.
HelloWorldClientYamlTestSuiteIT.java
/*...*/
package org.opensearch.rest.action;

import ...


public class HelloWorldClientYamlTestSuiteIT extends OpenSearchClientYamlSuiteTestCase {

    public HelloWorldClientYamlTestSuiteIT(@Name("yaml") ClientYamlTestCandidate testCandidate) {
        super(testCandidate);
    }

    @ParametersFactory
    public static Iterable<Object[]> parameters() throws Exception {
        return OpenSearchClientYamlSuiteTestCase.createParameters();
    }
}
And that concludes the integration tests. We finish up by editing our unit test for the logic performed by the action:
/*...*/
package org.opensearch.rest.action;

import ...

public class HelloWorldPluginTests extends OpenSearchTestCase {
    public void testBuildHelloWorldResponse() {
        String name = "What's in a name?";
        assertThat(HelloWorldService.buildResponse(name).content().utf8ToString(),
                equalTo("Hi " + name + "! Your plugin is installed and working:)"));
    }
}
Running the tests is as easy as:
➜ opensearch-rest-plugin gradle check
Trying out our new plugin
Building the plugin project
Now that everything is prepared building the plugin is as easy as:
➜ opensearch-rest-plugin gradle build
We can find our built plugin zip in the distributions folder, let’s take a look inside it:
➜ opensearch-rest-plugin vim build/distributions/opensearch-rest-plugin-0.0.1-SNAPSHOT.zip
You should see something like this:
plugin-descriptor.properties
opensearch-rest-plugin-0.0.1-SNAPSHOT.jar
NOTICE.txt
LICENSE.txt
Installing the plugin
Installing the plugin into OpenSearch will require getting a distribution of the project, we can create one from the cloned OpenSearch repo:
➜ OpenSearch git:(beta1-release) ./gradlew localDistro
And installing our plugin to OpenSearch:
➜  OpenSearch git:(beta1-release) cd build/distribution/local/opensearch-1.0.0-SNAPSHOT
➜  opensearch-1.0.0-SNAPSHOT git:(beta1-release) bin/opensearch-plugin install  file:///full/path/to/opensearch-rest-plugin/build/distributions/opensearch-rest-plugin-0.0.1-SNAPSHOT.zip
Running OpenSearch with our new plugin
Now we can finally fire up OpenSearch and try out our new plugin!
➜ opensearch-1.0.0-SNAPSHOT git:(beta1-release) bin/opensearch
After it starts running open a new terminal tab and run the following:
➜ ~ curl -XGET 'http://localhost:9200/_plugins/hello_world'
Hi! Your plugin is installed and working:)
Or you can add your name by running this:
➜ ~ curl -XPOST 'localhost:9200/_plugins/hello_world' -H 'Content-Type: application/json' -d '{"name":"Amitai"}'
Hi Amitai! Your plugin is installed and working:)
AMAZING!!!
Uninstalling the plugin
This is required if you want to make changes to the plugin and install it again. Installing a plugin with the same name twice results in an error.
➜ opensearch-1.0.0-SNAPSHOT git:(beta1-release) bin/OpenSearch-plugin remove opensearch-rest-plugin
-> removing [opensearch-rest-plugin]...
Key takeaways from creating my first plugin
I won’t lie to you, this simple plugin had a steep learning curve for understanding the full flow. I had everything and anything go wrong in the first try. It is important to remember that this is totally normal for large scale projects.
Having said that, here are some of the things I learned along the way:
- There are complex plugins and there are simple plugins, but they are all created using this thought process:
- What has a similar logic flow in the OpenSearch project to the logic I need my plugin to implement? -> this gives you the plugin interface you are looking for.
- What methods does this plugin interface expose?
- What additional classes do you need to implement in order to satisfy these methods?
Adding a plugin that has to do with REST handling essentially has taught me all the basics of REST handling in OpenSearch. To top it off – creating this plugin boosted my confidence to go and explore other aspects of the OSS project.
In this simple plugin use case we got to see the REST layer implementation, add an endpoint to the OpenSearch project and interact with it. In the following posts we will implement more complex plugins, getting to know other sections of this great project.
I would like to thank Sarat Vemulapalli from AWS for his feedback and assistance on this post.
This post is contributed by Amitai Stern from Logz.io and is co-published on Logz.io blog