You're viewing version 1.3 of the OpenSearch documentation. For the latest version, see the current documentation. For information about OpenSearch version maintenance, see Release Schedule and Maintenance Policy.
Data streams
If you’re ingesting continuously generated time-series data such as logs, events, and metrics into OpenSearch, you’re likely in a scenario where the number of documents grows rapidly and you don’t need to update older documents.
A typical workflow to manage time-series data involves multiple steps, such as creating a rollover index alias, defining a write index, and defining common mappings and settings for the backing indices.
Data streams simplify this process and enforce a setup that best suits time-series data, such as being designed primarily for append-only data and ensuring that each document has a timestamp field.
A data stream is internally composed of multiple backing indices. Search requests are routed to all the backing indices, while indexing requests are routed to the latest write index. ISM policies let you automatically handle index rollovers or deletions.
Get started with data streams
Step 1: Create an index template
To create a data stream, you first need to create an index template that configures a set of indices as a data stream. The data_stream object indicates that it’s a data stream and not a regular index template. The index pattern matches with the name of the data stream:
PUT _index_template/logs-template
{
  "index_patterns": [
    "my-data-stream",
    "logs-*"
  ],
  "data_stream": {},
  "priority": 100
}
In this case, each ingested document must have an @timestamp field. You also have the ability to define your own custom timestamp field as a property in the data_stream object. You can also add index mappings and other settings here, just as you would for a regular index template.
PUT _index_template/logs-template-nginx
{
  "index_patterns": "logs-nginx",
  "data_stream": {
    "timestamp_field": {
      "name": "request_time"
    }
  },
  "priority": 200,
  "template": {
    "settings": {
      "number_of_shards": 1,
      "number_of_replicas": 0
    }
  }
}
In this case, logs-nginx index matches both the logs-template and logs-template-nginx templates. When you have a tie, OpenSearch selects the matching index template with the higher priority value.
Step 2: Create a data stream
After you create an index template, you can create a data stream. You can use the data stream API to explicitly create a data stream. The data stream API initializes the first backing index:
PUT _data_stream/logs-redis
PUT _data_stream/logs-nginx
You can also directly start ingesting data without creating a data stream.
Because we have a matching index template with a data_stream object, OpenSearch automatically creates the data stream:
POST logs-staging/_doc
{
  "message": "login attempt failed",
  "@timestamp": "2013-03-01T00:00:00"
}
To see information about a specific data stream:
GET _data_stream/logs-nginx
Example response
{
  "data_streams" : [
    {
      "name" : "logs-nginx",
      "timestamp_field" : {
        "name" : "request_time"
      },
      "indices" : [
        {
          "index_name" : ".ds-logs-nginx-000001",
          "index_uuid" : "-VhmuhrQQ6ipYCmBhn6vLw"
        }
      ],
      "generation" : 1,
      "status" : "GREEN",
      "template" : "logs-template-nginx"
    }
  ]
}
You can see the name of the timestamp field, the list of the backing indices, and the template that’s used to create the data stream. You can also see the health of the data stream, which represents the lowest status of all its backing indices.
To see more insights about the data stream, use the _stats endpoint:
GET _data_stream/logs-nginx/_stats
Example response
{
  "_shards" : {
    "total" : 1,
    "successful" : 1,
    "failed" : 0
  },
  "data_stream_count" : 1,
  "backing_indices" : 1,
  "total_store_size_bytes" : 208,
  "data_streams" : [
    {
      "data_stream" : "logs-nginx",
      "backing_indices" : 1,
      "store_size_bytes" : 208,
      "maximum_timestamp" : 0
    }
  ]
}
To see information about all data streams, use the following request:
GET _data_stream
Step 3: Ingest data into the data stream
To ingest data into a data stream, you can use the regular indexing APIs. Make sure every document that you index has a timestamp field. If you try to ingest a document that doesn’t have a timestamp field, you get an error.
POST logs-redis/_doc
{
  "message": "login attempt",
  "@timestamp": "2013-03-01T00:00:00"
}
Step 4: Searching a data stream
You can search a data stream just like you search a regular index or an index alias. The search operation applies to all of the backing indices (all data present in the stream).
GET logs-redis/_search
{
  "query": {
    "match": {
      "message": "login"
    }
  }
}
Example response
{
  "took" : 514,
  "timed_out" : false,
  "_shards" : {
    "total" : 5,
    "successful" : 5,
    "skipped" : 0,
    "failed" : 0
  },
  "hits" : {
    "total" : {
      "value" : 1,
      "relation" : "eq"
    },
    "max_score" : 0.2876821,
    "hits" : [
      {
        "_index" : ".ds-logs-redis-000001",
        "_type" : "_doc",
        "_id" : "-rhVmXoBL6BAVWH3mMpC",
        "_score" : 0.2876821,
        "_source" : {
          "message" : "login attempt",
          "@timestamp" : "2013-03-01T00:00:00"
        }
      }
    ]
  }
}
Step 5: Rollover a data stream
A rollover operation creates a new backing index that becomes the data stream’s new write index.
To perform manual rollover operation on the data stream:
POST logs-redis/_rollover
Example response
{
  "acknowledged" : true,
  "shards_acknowledged" : true,
  "old_index" : ".ds-logs-redis-000001",
  "new_index" : ".ds-logs-redis-000002",
  "rolled_over" : true,
  "dry_run" : false,
  "conditions" : { }
}
If you now perform a GET operation on the logs-redis data stream, you see that the generation ID is incremented from 1 to 2.
You can also set up an Index State Management (ISM) policy to automate the rollover process for the data stream. The ISM policy is applied to the backing indices at the time of their creation. When you associate a policy to a data stream, it only affects the future backing indices of that data stream.
You also don’t need to provide the rollover_alias setting, because the ISM policy infers this information from the backing index.
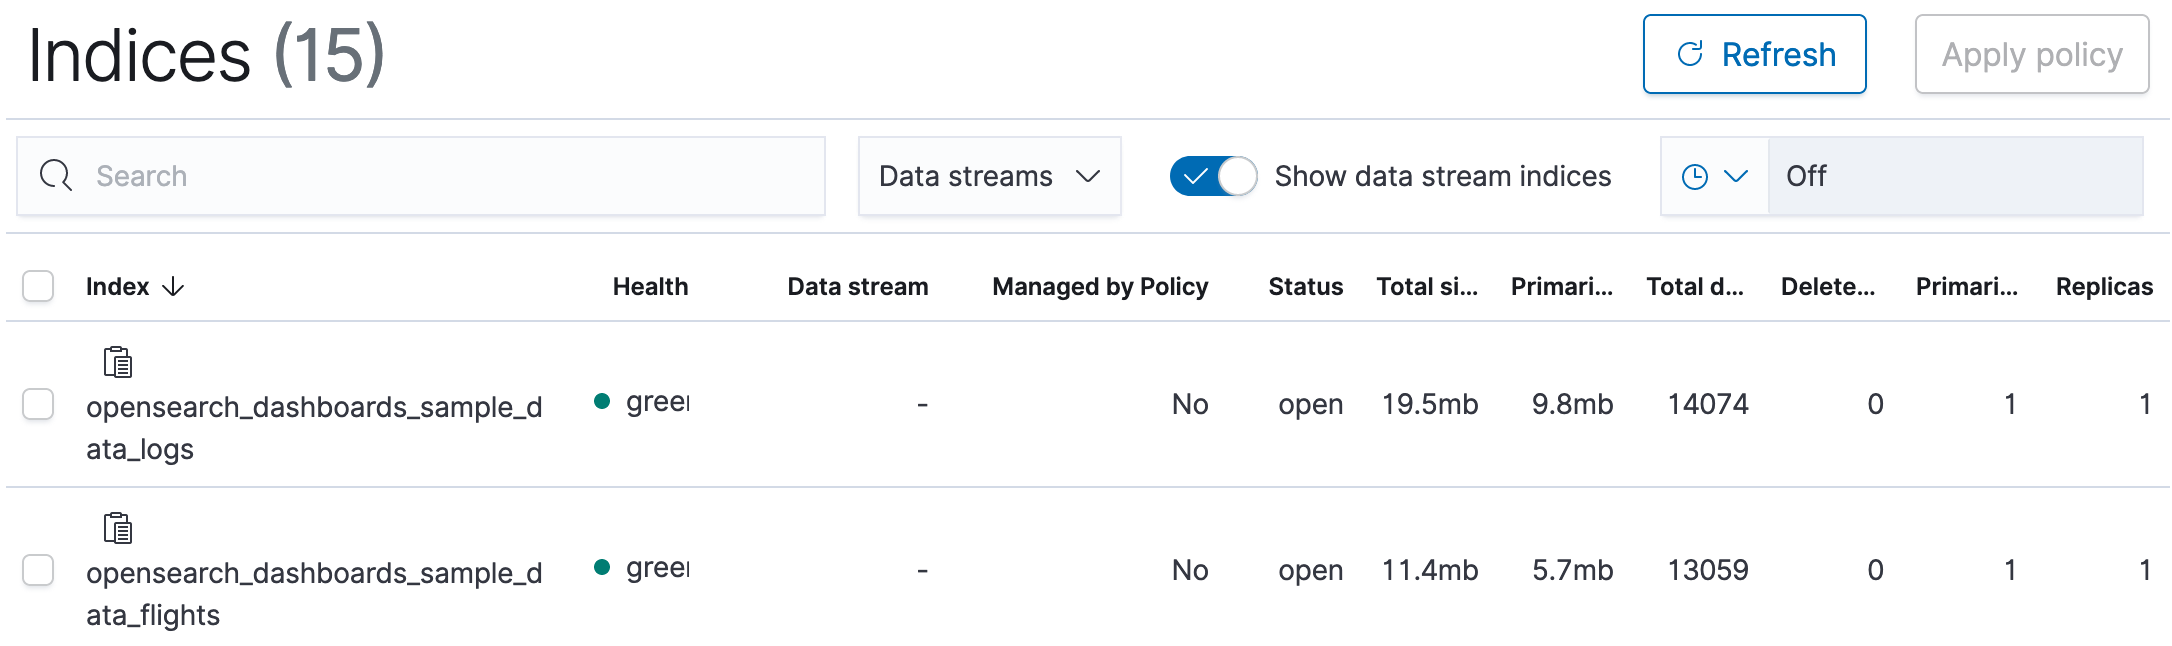
Step 6: Manage data streams in OpenSearch Dashboards
To manage data streams from OpenSearch Dashboards, open OpenSearch Dashboards, choose Index Management, select Indices or Policy managed indices.
You see a toggle switch for data streams that you can use to show or hide indices belonging to a data stream.
When you enable this switch, you see a data stream multi-select dropdown menu that you can use for filtering data streams. You also see a data stream column that shows you the name of the data stream the index is contained in.
You can select one or more data streams and apply an ISM policy on them. You can also apply a policy on any individual backing index.
You can performing visualizations on a data stream just like you would on a regular index or index alias.
Step 7: Delete a data stream
The delete operation first deletes the backing indices of a data stream and then deletes the data stream itself.
To delete a data stream and all of its hidden backing indices:
DELETE _data_stream/<name_of_data_stream>
You can use wildcards to delete more than one data stream.
We recommend deleting data from a data stream using an ISM policy.
You can also use asynchronous search, SQL, and PPL to query your data stream directly. You can also use the security plugin to define granular permissions for the data stream name.