Neural search tutorial
By default, OpenSearch calculates document scores using the Okapi BM25 algorithm. BM25 is a keyword-based algorithm that performs well on queries containing keywords but fails to capture the semantic meaning of the query terms. Semantic search, unlike keyword-based search, takes into account the meaning of the query in the search context. Thus, semantic search performs well when a query requires natural language understanding.
In this tutorial, you’ll learn how to use neural search to:
- Implement semantic search in OpenSearch.
- Implement hybrid search by combining semantic and keyword search to improve search relevance.
Terminology
It’s helpful to understand the following terms before starting this tutorial:
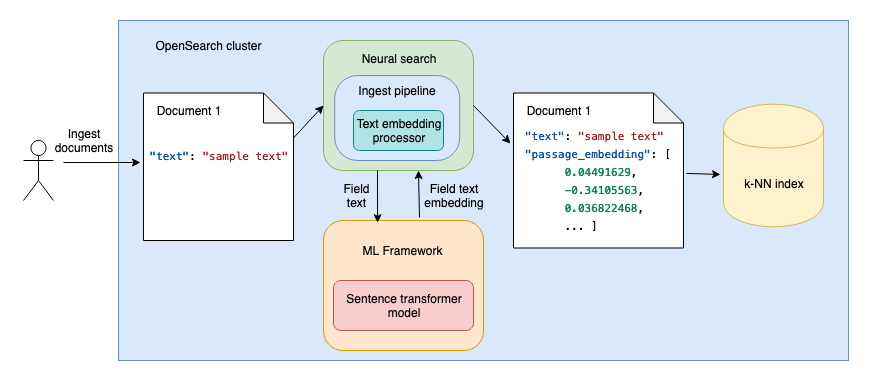
- Neural search: Facilitates vector search at ingestion time and at search time:
- At ingestion time, neural search uses language models to generate vector embeddings from the text fields in the document. The documents containing both the original text field and the vector embedding of the field are then indexed in a k-NN index, as shown in the following diagram.
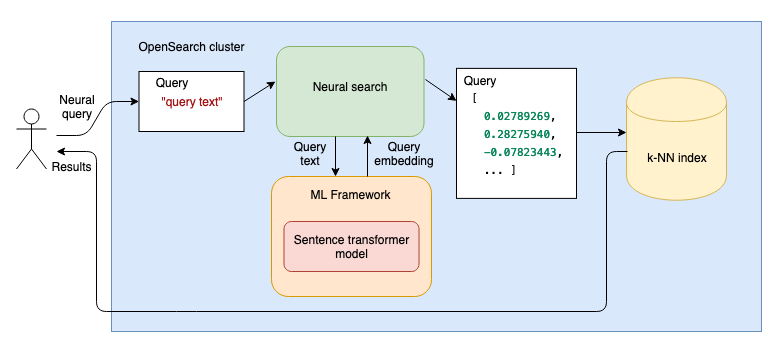
- At search time, when you then use a neural query, the query text is passed through a language model, and the resulting vector embeddings are compared with the document text vector embeddings to find the most relevant results, as shown in the following diagram.
-
Semantic search: Employs neural search in order to determine the intention of the user’s query in the search context, thereby improving search relevance.
- Hybrid search: Combines semantic and keyword search to improve search relevance.
OpenSearch components for semantic search
In this tutorial, you’ll implement semantic search using the following OpenSearch components:
- Model group
- Pretrained language models provided by OpenSearch
- Ingest pipeline
- k-NN vector
- Neural search
- Search pipeline
- Normalization processor
- Hybrid query
You’ll find descriptions of all these components as you follow the tutorial, so don’t worry if you’re not familiar with some of them. Each link in the preceding list will take you to the documentation section for the corresponding component.
Prerequisites
For this simple setup, you’ll use an OpenSearch-provided machine learning (ML) model and a cluster with no dedicated ML nodes. To ensure that this basic local setup works, send the following request to update ML-related cluster settings:
PUT _cluster/settings
{
  "persistent": {
    "plugins.ml_commons.only_run_on_ml_node": "false",
    "plugins.ml_commons.model_access_control_enabled": "true",
    "plugins.ml_commons.native_memory_threshold": "99"
  }
}
Advanced
For a custom local model setup, note the following requirements:
- To register a custom local model, you need to specify an additional
"allow_registering_model_via_url": "true"cluster setting. - In production, it’s best practice to separate the workloads by having dedicated ML nodes. On clusters with dedicated ML nodes, specify
"only_run_on_ml_node": "true"for improved performance.
For more information about ML-related cluster settings, see ML Commons cluster settings.
Tutorial overview
This tutorial consists of the following steps:
Some steps in the tutorial contain optional Test it sections. You can ensure that the step was successful by running requests in these sections.
After you’re done, follow the steps in the Clean up section to delete all created components.
Tutorial
You can follow this tutorial using your command line or the OpenSearch Dashboards Dev Tools console.
Step 1: Set up an ML language model
Neural search requires a language model in order to generate vector embeddings from text fields, both at ingestion time and query time.
Step 1(a): Choose a language model
For this tutorial, you’ll use the DistilBERT model from Hugging Face. It is one of the pretrained sentence transformer models available in OpenSearch that has shown some of the best results in benchmarking tests (for details, see this blog post). You’ll need the name, version, and dimension of the model to register it. You can find this information in the pretrained model table by selecting the config_url link corresponding to the model’s TorchScript artifact:
- The model name is
huggingface/sentence-transformers/msmarco-distilbert-base-tas-b. - The model version is
1.0.1. - The number of dimensions for this model is
768.
Take note of the dimensionality of the model because you’ll need it when you set up a k-NN index.
Advanced: Using a different model
Alternatively, you can choose one of the following options for your model:
-
Use any other pretrained model provided by OpenSearch. For more information, see OpenSearch-provided pretrained models.
-
Upload your own model to OpenSearch. For more information, see Custom local models.
-
Connect to a foundation model hosted on an external platform. For more information, see Connecting to remote models.
For information about choosing a model, see Further reading.
Step 1(b): Register a model group
For access control, models are organized into model groups (collections of versions of a particular model). Each model group name in the cluster must be globally unique. Registering a model group ensures the uniqueness of the model group name.
If you are registering the first version of a model without first registering the model group, a new model group is created automatically. For more information, see Model access control.
To register a model group with the access mode set to public, send the following request:
POST /_plugins/_ml/model_groups/_register
{
  "name": "NLP_model_group",
  "description": "A model group for NLP models",
  "access_mode": "public"
}
OpenSearch sends back the model group ID:
{
  "model_group_id": "Z1eQf4oB5Vm0Tdw8EIP2",
  "status": "CREATED"
}
You’ll use this ID to register the chosen model to the model group.
Test it
Search for the newly created model group by providing its model group ID in the request:
POST /_plugins/_ml/model_groups/_search
{
  "query": {
    "match": {
      "_id": "Z1eQf4oB5Vm0Tdw8EIP2"
    }
  }
}
The response contains the model group:
{
  "took": 0,
  "timed_out": false,
  "_shards": {
    "total": 1,
    "successful": 1,
    "skipped": 0,
    "failed": 0
  },
  "hits": {
    "total": {
      "value": 1,
      "relation": "eq"
    },
    "max_score": 1,
    "hits": [
      {
        "_index": ".plugins-ml-model-group",
        "_id": "Z1eQf4oB5Vm0Tdw8EIP2",
        "_version": 1,
        "_seq_no": 14,
        "_primary_term": 2,
        "_score": 1,
        "_source": {
          "created_time": 1694357262582,
          "access": "public",
          "latest_version": 0,
          "last_updated_time": 1694357262582,
          "name": "NLP_model_group",
          "description": "A model group for NLP models"
        }
      }
    ]
  }
}
Step 1(c): Register the model to the model group
To register the model to the model group, provide the model group ID in the register request:
POST /_plugins/_ml/models/_register
{
  "name": "huggingface/sentence-transformers/msmarco-distilbert-base-tas-b",
  "version": "1.0.1",
  "model_group_id": "Z1eQf4oB5Vm0Tdw8EIP2",
  "model_format": "TORCH_SCRIPT"
}
Registering a model is an asynchronous task. OpenSearch sends back a task ID for this task:
{
  "task_id": "aFeif4oB5Vm0Tdw8yoN7",
  "status": "CREATED"
}
OpenSearch downloads the config file for the model and the model contents from the URL. Because the model is larger than 10 MB in size, OpenSearch splits it into chunks of up to 10 MB and saves those chunks in the model index. You can check the status of the task by using the Tasks API:
GET /_plugins/_ml/tasks/aFeif4oB5Vm0Tdw8yoN7
Once the task is complete, the task state will be COMPLETED and the Tasks API response will contain a model ID for the registered model:
{
  "model_id": "aVeif4oB5Vm0Tdw8zYO2",
  "task_type": "REGISTER_MODEL",
  "function_name": "TEXT_EMBEDDING",
  "state": "COMPLETED",
  "worker_node": [
    "4p6FVOmJRtu3wehDD74hzQ"
  ],
  "create_time": 1694358489722,
  "last_update_time": 1694358499139,
  "is_async": true
}
You’ll need the model ID in order to use this model for several of the following steps.
Test it
Search for the newly created model by providing its ID in the request:
GET /_plugins/_ml/models/aVeif4oB5Vm0Tdw8zYO2
The response contains the model:
{
  "name": "huggingface/sentence-transformers/msmarco-distilbert-base-tas-b",
  "model_group_id": "Z1eQf4oB5Vm0Tdw8EIP2",
  "algorithm": "TEXT_EMBEDDING",
  "model_version": "1",
  "model_format": "TORCH_SCRIPT",
  "model_state": "REGISTERED",
  "model_content_size_in_bytes": 266352827,
  "model_content_hash_value": "acdc81b652b83121f914c5912ae27c0fca8fabf270e6f191ace6979a19830413",
  "model_config": {
    "model_type": "distilbert",
    "embedding_dimension": 768,
    "framework_type": "SENTENCE_TRANSFORMERS",
    "all_config": """{"_name_or_path":"old_models/msmarco-distilbert-base-tas-b/0_Transformer","activation":"gelu","architectures":["DistilBertModel"],"attention_dropout":0.1,"dim":768,"dropout":0.1,"hidden_dim":3072,"initializer_range":0.02,"max_position_embeddings":512,"model_type":"distilbert","n_heads":12,"n_layers":6,"pad_token_id":0,"qa_dropout":0.1,"seq_classif_dropout":0.2,"sinusoidal_pos_embds":false,"tie_weights_":true,"transformers_version":"4.7.0","vocab_size":30522}"""
  },
  "created_time": 1694482261832,
  "last_updated_time": 1694482324282,
  "last_registered_time": 1694482270216,
  "last_deployed_time": 1694482324282,
  "total_chunks": 27,
  "planning_worker_node_count": 1,
  "current_worker_node_count": 1,
  "planning_worker_nodes": [
    "4p6FVOmJRtu3wehDD74hzQ"
  ],
  "deploy_to_all_nodes": true
}
The response contains the model information. You can see that the model_state is REGISTERED. Additionally, the model was split into 27 chunks, as shown in the total_chunks field.
Advanced: Registering a custom model
To register a custom model, you must provide a model configuration in the register request. For example, the following is a register request containing the full format for the model used in this tutorial:
POST /_plugins/_ml/models/_register
{
	"name": "sentence-transformers/msmarco-distilbert-base-tas-b",
	"version": "1.0.1",
	"description": "This is a port of the DistilBert TAS-B Model to sentence-transformers model: It maps sentences & paragraphs to a 768 dimensional dense vector space and is optimized for the task of semantic search.",
	"model_task_type": "TEXT_EMBEDDING",
	"model_format": "ONNX",
	"model_content_size_in_bytes": 266291330,
	"model_content_hash_value": "a3c916f24239fbe32c43be6b24043123d49cd2c41b312fc2b29f2fc65e3c424c",
	"model_config": {
		"model_type": "distilbert",
		"embedding_dimension": 768,
		"framework_type": "huggingface_transformers",
		"pooling_mode": "CLS",
		"normalize_result": false,
		"all_config": "{\"_name_or_path\":\"old_models/msmarco-distilbert-base-tas-b/0_Transformer\",\"activation\":\"gelu\",\"architectures\":[\"DistilBertModel\"],\"attention_dropout\":0.1,\"dim\":768,\"dropout\":0.1,\"hidden_dim\":3072,\"initializer_range\":0.02,\"max_position_embeddings\":512,\"model_type\":\"distilbert\",\"n_heads\":12,\"n_layers\":6,\"pad_token_id\":0,\"qa_dropout\":0.1,\"seq_classif_dropout\":0.2,\"sinusoidal_pos_embds\":false,\"tie_weights_\":true,\"transformers_version\":\"4.7.0\",\"vocab_size\":30522}"
	},
	"created_time": 1676074079195,
  "model_group_id": "Z1eQf4oB5Vm0Tdw8EIP2",
	"url": "https://artifacts.opensearch.org/models/ml-models/huggingface/sentence-transformers/msmarco-distilbert-base-tas-b/1.0.1/onnx/sentence-transformers_msmarco-distilbert-base-tas-b-1.0.1-onnx.zip"
}
For more information, see Using ML models within OpenSearch.
Step 1(d): Deploy the model
Once the model is registered, it is saved in the model index. Next, you’ll need to deploy the model. Deploying a model creates a model instance and caches the model in memory. To deploy the model, provide its model ID to the _deploy endpoint:
POST /_plugins/_ml/models/aVeif4oB5Vm0Tdw8zYO2/_deploy
Like the register operation, the deploy operation is asynchronous, so you’ll get a task ID in the response:
{
  "task_id": "ale6f4oB5Vm0Tdw8NINO",
  "status": "CREATED"
}
You can check the status of the task by using the Tasks API:
GET /_plugins/_ml/tasks/ale6f4oB5Vm0Tdw8NINO
Once the task is complete, the task state will be COMPLETED:
{
  "model_id": "aVeif4oB5Vm0Tdw8zYO2",
  "task_type": "DEPLOY_MODEL",
  "function_name": "TEXT_EMBEDDING",
  "state": "COMPLETED",
  "worker_node": [
    "4p6FVOmJRtu3wehDD74hzQ"
  ],
  "create_time": 1694360024141,
  "last_update_time": 1694360027940,
  "is_async": true
}
Test it
Search for the deployed model by providing its ID in the request:
GET /_plugins/_ml/models/aVeif4oB5Vm0Tdw8zYO2
The response shows the model state as DEPLOYED:
{
  "name": "huggingface/sentence-transformers/msmarco-distilbert-base-tas-b",
  "model_group_id": "Z1eQf4oB5Vm0Tdw8EIP2",
  "algorithm": "TEXT_EMBEDDING",
  "model_version": "1",
  "model_format": "TORCH_SCRIPT",
  "model_state": "DEPLOYED",
  "model_content_size_in_bytes": 266352827,
  "model_content_hash_value": "acdc81b652b83121f914c5912ae27c0fca8fabf270e6f191ace6979a19830413",
  "model_config": {
    "model_type": "distilbert",
    "embedding_dimension": 768,
    "framework_type": "SENTENCE_TRANSFORMERS",
    "all_config": """{"_name_or_path":"old_models/msmarco-distilbert-base-tas-b/0_Transformer","activation":"gelu","architectures":["DistilBertModel"],"attention_dropout":0.1,"dim":768,"dropout":0.1,"hidden_dim":3072,"initializer_range":0.02,"max_position_embeddings":512,"model_type":"distilbert","n_heads":12,"n_layers":6,"pad_token_id":0,"qa_dropout":0.1,"seq_classif_dropout":0.2,"sinusoidal_pos_embds":false,"tie_weights_":true,"transformers_version":"4.7.0","vocab_size":30522}"""
  },
  "created_time": 1694482261832,
  "last_updated_time": 1694482324282,
  "last_registered_time": 1694482270216,
  "last_deployed_time": 1694482324282,
  "total_chunks": 27,
  "planning_worker_node_count": 1,
  "current_worker_node_count": 1,
  "planning_worker_nodes": [
    "4p6FVOmJRtu3wehDD74hzQ"
  ],
  "deploy_to_all_nodes": true
}
You can also receive statistics for all deployed models in your cluster by sending a Models Profile API request:
GET /_plugins/_ml/profile/models
Step 2: Ingest data with neural search
Neural search uses a language model to transform text into vector embeddings. During ingestion, neural search creates vector embeddings for the text fields in the request. During search, you can generate vector embeddings for the query text by applying the same model, allowing you to perform vector similarity search on the documents.
Step 2(a): Create an ingest pipeline for neural search
Now that you have deployed a model, you can use this model to configure neural search. First, you need to create an ingest pipeline that contains one processor: a task that transforms document fields before documents are ingested into an index. For neural search, you’ll set up a text_embedding processor that creates vector embeddings from text. You’ll need the model_id of the model you set up in the previous section and a field_map, which specifies the name of the field from which to take the text (text) and the name of the field in which to record embeddings (passage_embedding):
PUT /_ingest/pipeline/nlp-ingest-pipeline
{
  "description": "An NLP ingest pipeline",
  "processors": [
    {
      "text_embedding": {
        "model_id": "aVeif4oB5Vm0Tdw8zYO2",
        "field_map": {
          "text": "passage_embedding"
        }
      }
    }
  ]
}
Test it
Search for the created ingest pipeline by using the Ingest API:
GET /_ingest/pipeline
The response contains the ingest pipeline:
{
  "nlp-ingest-pipeline": {
    "description": "An NLP ingest pipeline",
    "processors": [
      {
        "text_embedding": {
          "model_id": "aVeif4oB5Vm0Tdw8zYO2",
          "field_map": {
            "text": "passage_embedding"
          }
        }
      }
    ]
  }
}
Step 2(b): Create a k-NN index
Now you’ll create a k-NN index with a field named text, which contains an image description, and a knn_vector field named passage_embedding, which contains the vector embedding of the text. Additionally, set the default ingest pipeline to the nlp-ingest-pipeline you created in the previous step:
PUT /my-nlp-index
{
  "settings": {
    "index.knn": true,
    "default_pipeline": "nlp-ingest-pipeline"
  },
  "mappings": {
    "properties": {
      "id": {
        "type": "text"
      },
      "passage_embedding": {
        "type": "knn_vector",
        "dimension": 768,
        "method": {
          "engine": "lucene",
          "space_type": "l2",
          "name": "hnsw",
          "parameters": {}
        }
      },
      "text": {
        "type": "text"
      }
    }
  }
}
Setting up a k-NN index allows you to later perform a vector search on the passage_embedding field.
Test it
Use the following requests to get the settings and the mappings of the created index:
GET /my-nlp-index/_settings
GET /my-nlp-index/_mappings
Step 2(c): Ingest documents into the index
In this step, you’ll ingest several sample documents into the index. The sample data is taken from the Flickr image dataset. Each document contains a text field corresponding to the image description and an id field corresponding to the image ID:
PUT /my-nlp-index/_doc/1
{
  "text": "A West Virginia university women 's basketball team , officials , and a small gathering of fans are in a West Virginia arena .",
  "id": "4319130149.jpg"
}
PUT /my-nlp-index/_doc/2
{
  "text": "A wild animal races across an uncut field with a minimal amount of trees .",
  "id": "1775029934.jpg"
}
PUT /my-nlp-index/_doc/3
{
  "text": "People line the stands which advertise Freemont 's orthopedics , a cowboy rides a light brown bucking bronco .",
  "id": "2664027527.jpg"
}
PUT /my-nlp-index/_doc/4
{
  "text": "A man who is riding a wild horse in the rodeo is very near to falling off .",
  "id": "4427058951.jpg"
}
PUT /my-nlp-index/_doc/5
{
  "text": "A rodeo cowboy , wearing a cowboy hat , is being thrown off of a wild white horse .",
  "id": "2691147709.jpg"
}
When the documents are ingested into the index, the text_embedding processor creates an additional field that contains vector embeddings and adds that field to the document. To see an example document that is indexed, search for document 1:
GET /my-nlp-index/_doc/1
The response includes the document _source containing the original text and id fields and the added passage_embedding field:
{
  "_index": "my-nlp-index",
  "_id": "1",
  "_version": 1,
  "_seq_no": 0,
  "_primary_term": 1,
  "found": true,
  "_source": {
    "passage_embedding": [
      0.04491629,
      -0.34105563,
      0.036822468,
      -0.14139028,
      ...
    ],
    "text": "A West Virginia university women 's basketball team , officials , and a small gathering of fans are in a West Virginia arena .",
    "id": "4319130149.jpg"
  }
}
Step 3: Search the data
Now you’ll search the index using keyword search, neural search, and a combination of the two.
Search using a keyword search
To search using a keyword search, use a match query. You’ll exclude embeddings from the results:
GET /my-nlp-index/_search
{
  "_source": {
    "excludes": [
      "passage_embedding"
    ]
  },
  "query": {
    "match": {
      "text": {
        "query": "wild west"
      }
    }
  }
}
Document 3 is not returned because it does not contain the specified keywords. Documents containing the words rodeo and cowboy are scored lower because semantic meaning is not considered:
Results
{
  "took": 647,
  "timed_out": false,
  "_shards": {
    "total": 1,
    "successful": 1,
    "skipped": 0,
    "failed": 0
  },
  "hits": {
    "total": {
      "value": 4,
      "relation": "eq"
    },
    "max_score": 1.7878418,
    "hits": [
      {
        "_index": "my-nlp-index",
        "_id": "1",
        "_score": 1.7878418,
        "_source": {
          "text": "A West Virginia university women 's basketball team , officials , and a small gathering of fans are in a West Virginia arena .",
          "id": "4319130149.jpg"
        }
      },
      {
        "_index": "my-nlp-index",
        "_id": "2",
        "_score": 0.58093566,
        "_source": {
          "text": "A wild animal races across an uncut field with a minimal amount of trees .",
          "id": "1775029934.jpg"
        }
      },
      {
        "_index": "my-nlp-index",
        "_id": "5",
        "_score": 0.55228686,
        "_source": {
          "text": "A rodeo cowboy , wearing a cowboy hat , is being thrown off of a wild white horse .",
          "id": "2691147709.jpg"
        }
      },
      {
        "_index": "my-nlp-index",
        "_id": "4",
        "_score": 0.53899646,
        "_source": {
          "text": "A man who is riding a wild horse in the rodeo is very near to falling off .",
          "id": "4427058951.jpg"
        }
      }
    ]
  }
}
Search using a neural search
To search using a neural search, use a neural query and provide the model ID of the model you set up earlier so that vector embeddings for the query text are generated with the model used at ingestion time:
GET /my-nlp-index/_search
{
  "_source": {
    "excludes": [
      "passage_embedding"
    ]
  },
  "query": {
    "neural": {
      "passage_embedding": {
        "query_text": "wild west",
        "model_id": "aVeif4oB5Vm0Tdw8zYO2",
        "k": 5
      }
    }
  }
}
This time, the response not only contains all five documents, but the document order is also improved because neural search considers semantic meaning:
Results
{
  "took": 25,
  "timed_out": false,
  "_shards": {
    "total": 1,
    "successful": 1,
    "skipped": 0,
    "failed": 0
  },
  "hits": {
    "total": {
      "value": 5,
      "relation": "eq"
    },
    "max_score": 0.01585195,
    "hits": [
      {
        "_index": "my-nlp-index",
        "_id": "4",
        "_score": 0.01585195,
        "_source": {
          "text": "A man who is riding a wild horse in the rodeo is very near to falling off .",
          "id": "4427058951.jpg"
        }
      },
      {
        "_index": "my-nlp-index",
        "_id": "2",
        "_score": 0.015748845,
        "_source": {
          "text": "A wild animal races across an uncut field with a minimal amount of trees.",
          "id": "1775029934.jpg"
        }
      },
      {
        "_index": "my-nlp-index",
        "_id": "5",
        "_score": 0.015177963,
        "_source": {
          "text": "A rodeo cowboy , wearing a cowboy hat , is being thrown off of a wild white horse .",
          "id": "2691147709.jpg"
        }
      },
      {
        "_index": "my-nlp-index",
        "_id": "1",
        "_score": 0.013272902,
        "_source": {
          "text": "A West Virginia university women 's basketball team , officials , and a small gathering of fans are in a West Virginia arena .",
          "id": "4319130149.jpg"
        }
      },
      {
        "_index": "my-nlp-index",
        "_id": "3",
        "_score": 0.011347735,
        "_source": {
          "text": "People line the stands which advertise Freemont 's orthopedics , a cowboy rides a light brown bucking bronco .",
          "id": "2664027527.jpg"
        }
      }
    ]
  }
}
Search using a hybrid search
Hybrid search combines keyword and neural search to improve search relevance. To implement hybrid search, you need to set up a search pipeline that runs at search time. The search pipeline you’ll configure intercepts search results at an intermediate stage and applies the normalization-processor to them. The normalization-processor normalizes and combines the document scores from multiple query clauses, rescoring the documents according to the chosen normalization and combination techniques.
Step 1: Configure a search pipeline
To configure a search pipeline with a normalization-processor, use the following request. The normalization technique in the processor is set to min_max, and the combination technique is set to arithmetic_mean. The weights array specifies the weights assigned to each query clause as decimal percentages:
PUT /_search/pipeline/nlp-search-pipeline
{
  "description": "Post processor for hybrid search",
  "phase_results_processors": [
    {
      "normalization-processor": {
        "normalization": {
          "technique": "min_max"
        },
        "combination": {
          "technique": "arithmetic_mean",
          "parameters": {
            "weights": [
              0.3,
              0.7
            ]
          }
        }
      }
    }
  ]
}
Step 2: Search with the hybrid query
You’ll use the hybrid query to combine the match and neural query clauses. Make sure to apply the previously created nlp-search-pipeline to the request in the query parameter:
GET /my-nlp-index/_search?search_pipeline=nlp-search-pipeline
{
  "_source": {
    "exclude": [
      "passage_embedding"
    ]
  },
  "query": {
    "hybrid": {
      "queries": [
        {
          "match": {
            "text": {
              "query": "cowboy rodeo bronco"
            }
          }
        },
        {
          "neural": {
            "passage_embedding": {
              "query_text": "wild west",
              "model_id": "aVeif4oB5Vm0Tdw8zYO2",
              "k": 5
            }
          }
        }
      ]
    }
  }
}
Not only does OpenSearch return documents that match the semantic meaning of wild west, but now the documents containing words related to the wild west theme are also scored higher relative to the others:
Results
{
  "took": 27,
  "timed_out": false,
  "_shards": {
    "total": 1,
    "successful": 1,
    "skipped": 0,
    "failed": 0
  },
  "hits": {
    "total": {
      "value": 5,
      "relation": "eq"
    },
    "max_score": 0.86481035,
    "hits": [
      {
        "_index": "my-nlp-index",
        "_id": "5",
        "_score": 0.86481035,
        "_source": {
          "text": "A rodeo cowboy , wearing a cowboy hat , is being thrown off of a wild white horse .",
          "id": "2691147709.jpg"
        }
      },
      {
        "_index": "my-nlp-index",
        "_id": "4",
        "_score": 0.7003,
        "_source": {
          "text": "A man who is riding a wild horse in the rodeo is very near to falling off .",
          "id": "4427058951.jpg"
        }
      },
      {
        "_index": "my-nlp-index",
        "_id": "2",
        "_score": 0.6839765,
        "_source": {
          "text": "A wild animal races across an uncut field with a minimal amount of trees.",
          "id": "1775029934.jpg"
        }
      },
      {
        "_index": "my-nlp-index",
        "_id": "3",
        "_score": 0.3007,
        "_source": {
          "text": "People line the stands which advertise Freemont 's orthopedics , a cowboy rides a light brown bucking bronco .",
          "id": "2664027527.jpg"
        }
      },
      {
        "_index": "my-nlp-index",
        "_id": "1",
        "_score": 0.29919013,
        "_source": {
          "text": "A West Virginia university women 's basketball team , officials , and a small gathering of fans are in a West Virginia arena .",
          "id": "4319130149.jpg"
        }
      }
    ]
  }
}
Instead of specifying the search pipeline in every request, you can set it as a default search pipeline for the index as follows:
PUT /my-nlp-index/_settings
{
  "index.search.default_pipeline" : "nlp-search-pipeline"
}
You can now experiment with different weights, normalization techniques, and combination techniques. For more information, see the normalization-processor and hybrid query documentation.
Advanced
You can parameterize the search by using search templates. Search templates hide implementation details, reducing the number of nested levels and thus the query complexity. For more information, see search templates.
Clean up
After you’re done, delete the components you’ve created in this tutorial from the cluster:
DELETE /my-nlp-index
DELETE /_search/pipeline/nlp-search-pipeline
DELETE /_ingest/pipeline/nlp-ingest-pipeline
POST /_plugins/_ml/models/aVeif4oB5Vm0Tdw8zYO2/_undeploy
DELETE /_plugins/_ml/models/aVeif4oB5Vm0Tdw8zYO2
DELETE /_plugins/_ml/model_groups/Z1eQf4oB5Vm0Tdw8EIP2
Further reading
- Read about the basics of OpenSearch semantic search in Building a semantic search engine in OpenSearch.
- Read about the benefits of combining keyword and neural search, the normalization and combination technique options, and benchmarking tests in The ABCs of semantic search in OpenSearch: Architectures, benchmarks, and combination strategies.