Indexes
Introduced 2.5
In the Index Management section, you can perform the operations available in the Index API.
Index policies
Policies are configurations that define the possible states of an index, the actions to perform when an index enters a given state, and the conditions that must be met to transition between states:
- States: The possible states of an index, including the default state for new indexes. For example, you might name your states
hot,warm, ordelete. For more information, see States. - Actions: Any actions that you want the plugin to take when an index enters a given state, such as performing a rollover. For more information, see Actions.
- Transitions: The conditions that must be met for an index to move into a new state. For example, if an index is more than 8 weeks old, you might want to move it to the
deletestate. For more information, see Transitions.
You can also upload a JSON document to specify an index policy.
You have complete flexibility in designing your policies. You can create any state, transition to any other state, and specify any number of actions in each state.
To attach policies to indexes, perform the following steps:
- Under Index Management, choose Index policies.
- Select the index or indexes to which you want to attach your policy.
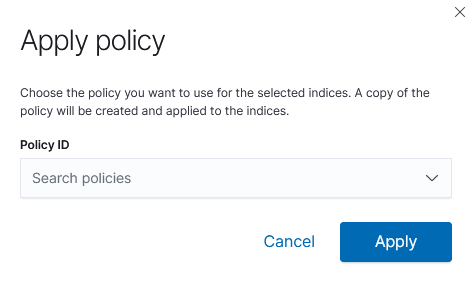
- Choose the Apply policy button.
- From the Policy ID menu, select the policy that you created. View the preview of your policy.
- (Optional): Specify a rollover alias if your policy includes a rollover operation. Make sure that the alias already exists. For more information about the rollover operation, see rollover.
- Choose the Apply button.
After you attach a policy to an index, Index State Management (ISM) creates a job that runs every 5 minutes by default to perform policy actions, check conditions, and transition the index into different states. To change the default time interval for this job, see Settings.
Policy jobs don’t run if the cluster state is red.
Managed indexes
To attach policies to indexes, perform the following steps:
- Under Index Management, choose Manage Indices.
- Select the index or indexes to which you want to attach your policy.
- Choose the Change policy button.
- Choose the Apply policy button.
Indexes
The Indices section displays a list of indexes in your OpenSearch cluster. For each index, you can see its health status (green, yellow, or red), policy (if the index is managed by a policy), status, total size, primary sizes, total documents, deleted documents, primaries, and replicas.
The following are the three index health statuses:
- Green: All primary and replica shards are assigned.
- Yellow: At least one replica shard is not assigned.
- Red: At least one primary shard is not assigned.
Creating an index
While you can create an index by using a document as a base, you can also create an empty index for later use.
To create an index, select the Create Index button located under the Indices section of Index Management. Then define the index by setting the following parameters:
- Index name
- Number of primary shards
- Number of replicas
- Refresh interval
You can also add fields and objects using either the visual editor or the JSON editor.
The Advanced settings allow you to upload a JSON configuration.
Applying a policy
If you analyze time-series data, you likely want to prioritize new data over old data. You might periodically perform certain operations on older indexes, such as reducing replica count or deleting them.
ISM is a plugin that lets you automate these periodic administrative operations by triggering them based on changes in the index age, index size, or number of documents. You can define policies that automatically handle index rollovers or deletions to fit your use case.
For example, you can define a policy that moves your index into a read_only state after 30 days and then deletes it after a set period of 90 days. You can also set up the policy to send you a notification message when the index is deleted.
You might want to perform an index rollover after a certain amount of time or run a force_merge operation on an index during off-peak hours to improve search performance during peak hours.
To apply a policy, select the index to which you want to apply the policy from the Indices list under Index Management. Then select the Actions button and select Apply policy from the dropdown list as shown in the following image.
Closing an index
The close index operation closes an index. Once an index is closed, you cannot add data to it or search for any data within the index.
To close an index, select the index you want to close from the Indices list under Index Management. Then select the Actions button and select Close from the dropdown list.
Opening an index
The open index operation opens a closed index, letting you add data to it or search for data within the index.
To open an index, select the index you want to open from the Indices list under Index Management. Then select the Actions button and select Open from the dropdown list.
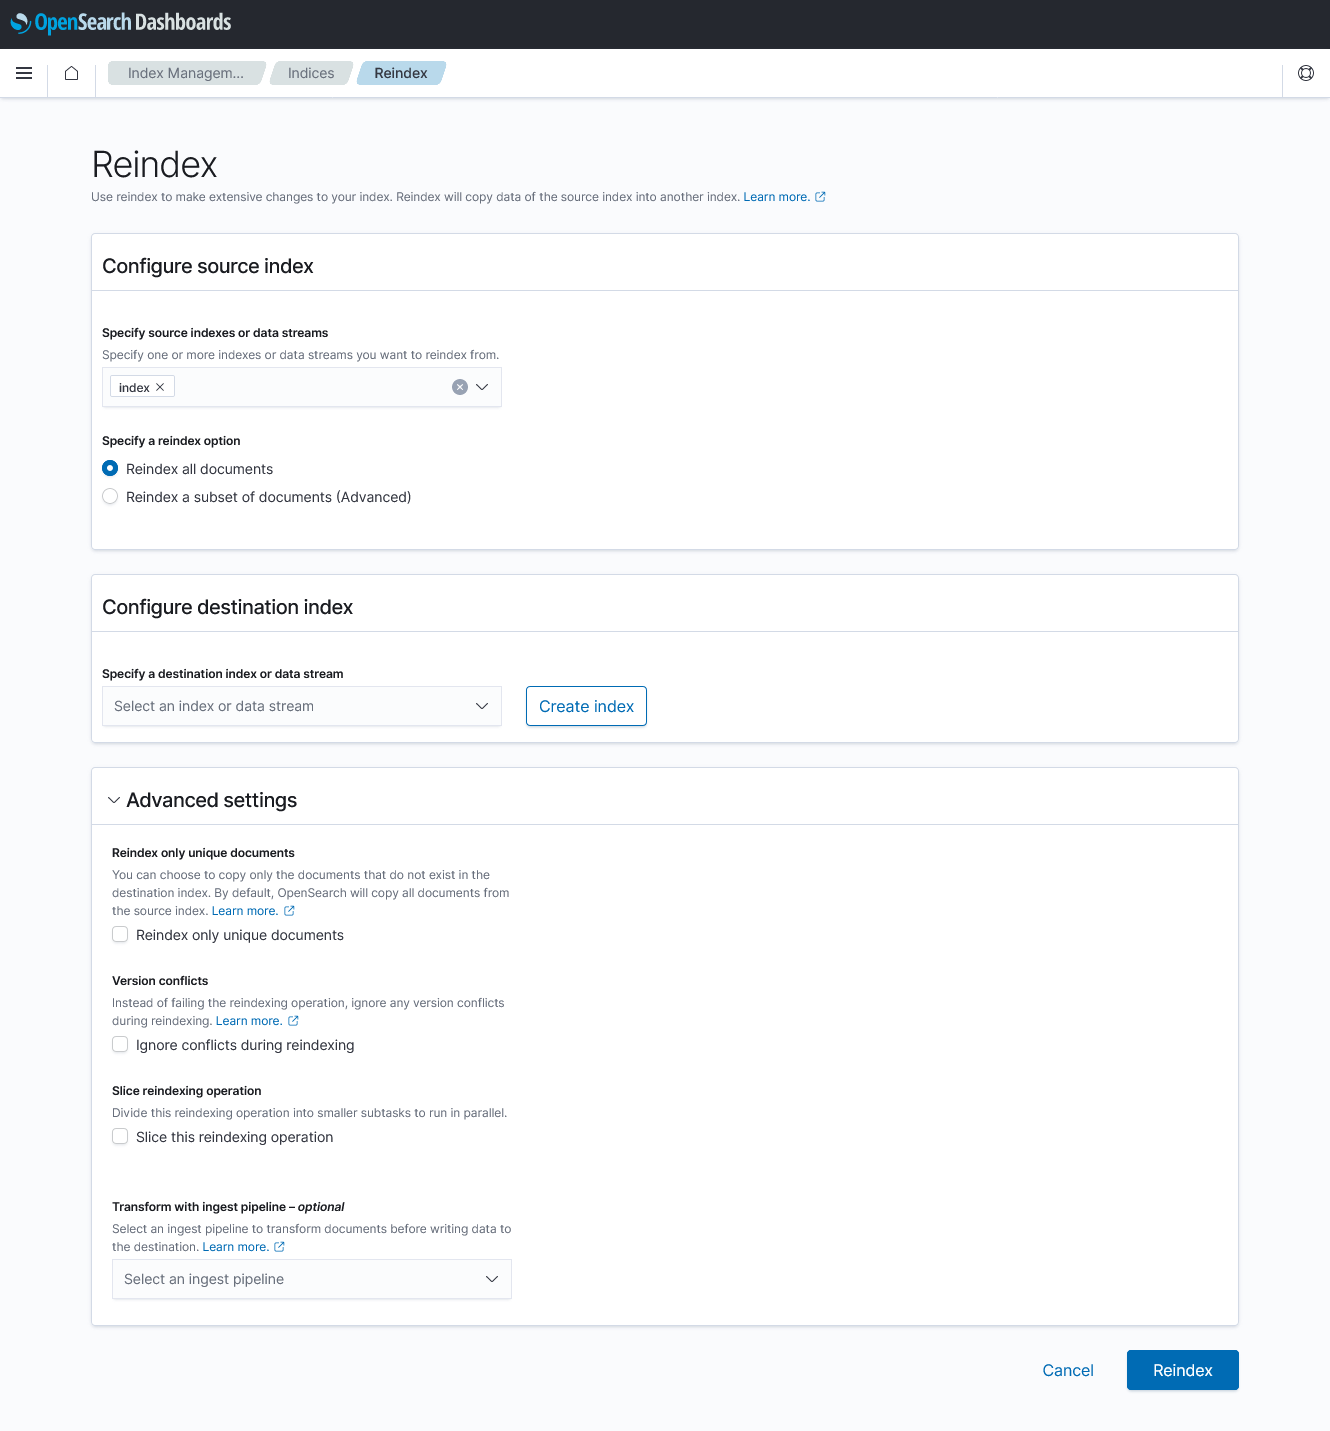
Reindexing an index
The reindex operation lets you copy all of your data or a subset of data from a source index into a destination index.
To reindex an index, select the index from the Indices list under Index Management. Then select the Actions button and select Reindex from the dropdown list as shown in the following image.
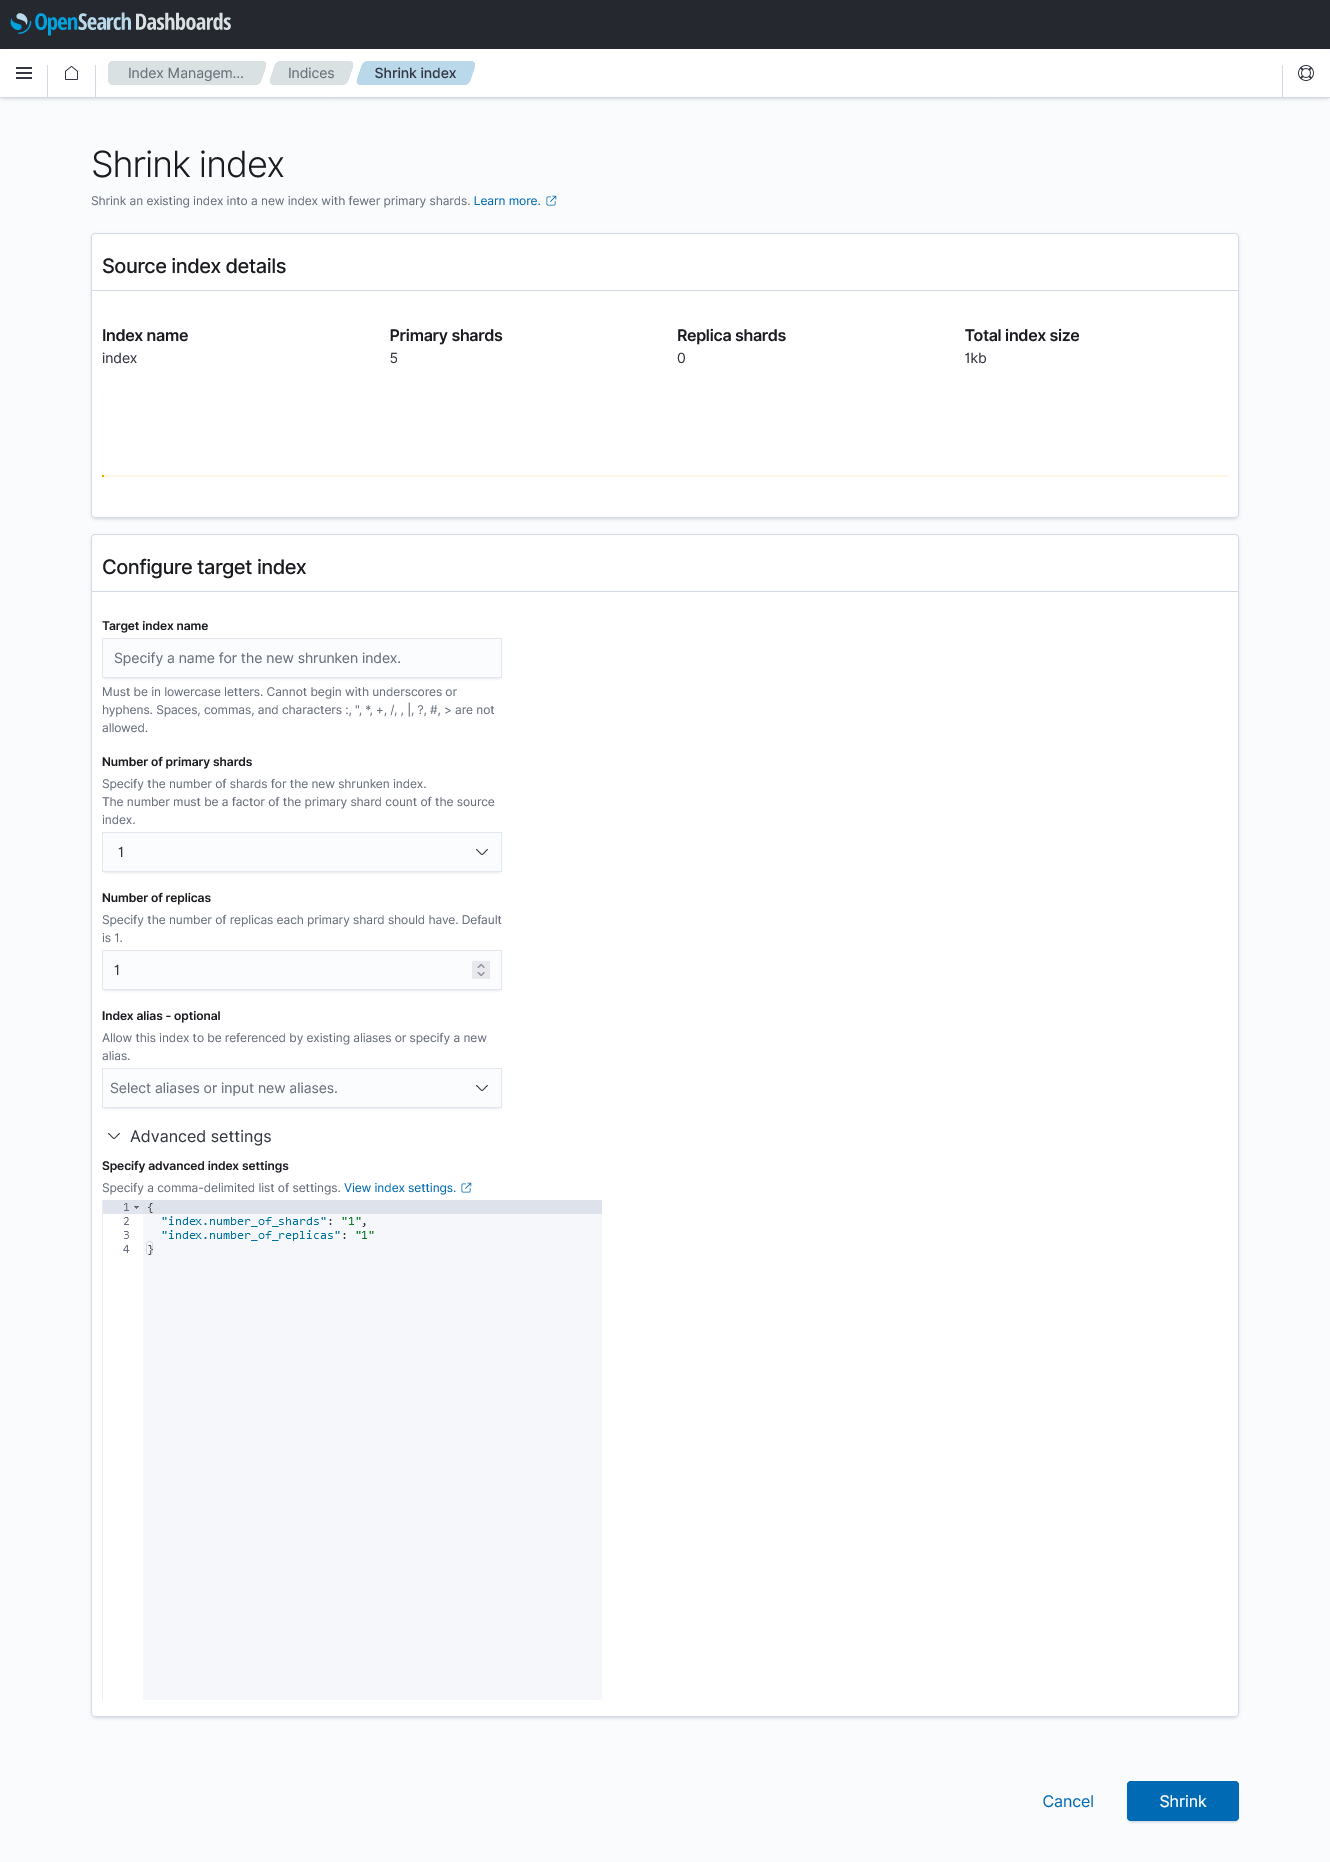
Shrinking an index
The shrink index operation copies all of the data in an existing index into a new index with fewer primary shards.
To shrink an index, select the index you want to shrink from the Indices list under Index Management. Then choose the Actions button and choose Shrink from the dropdown list as shown in the following image.
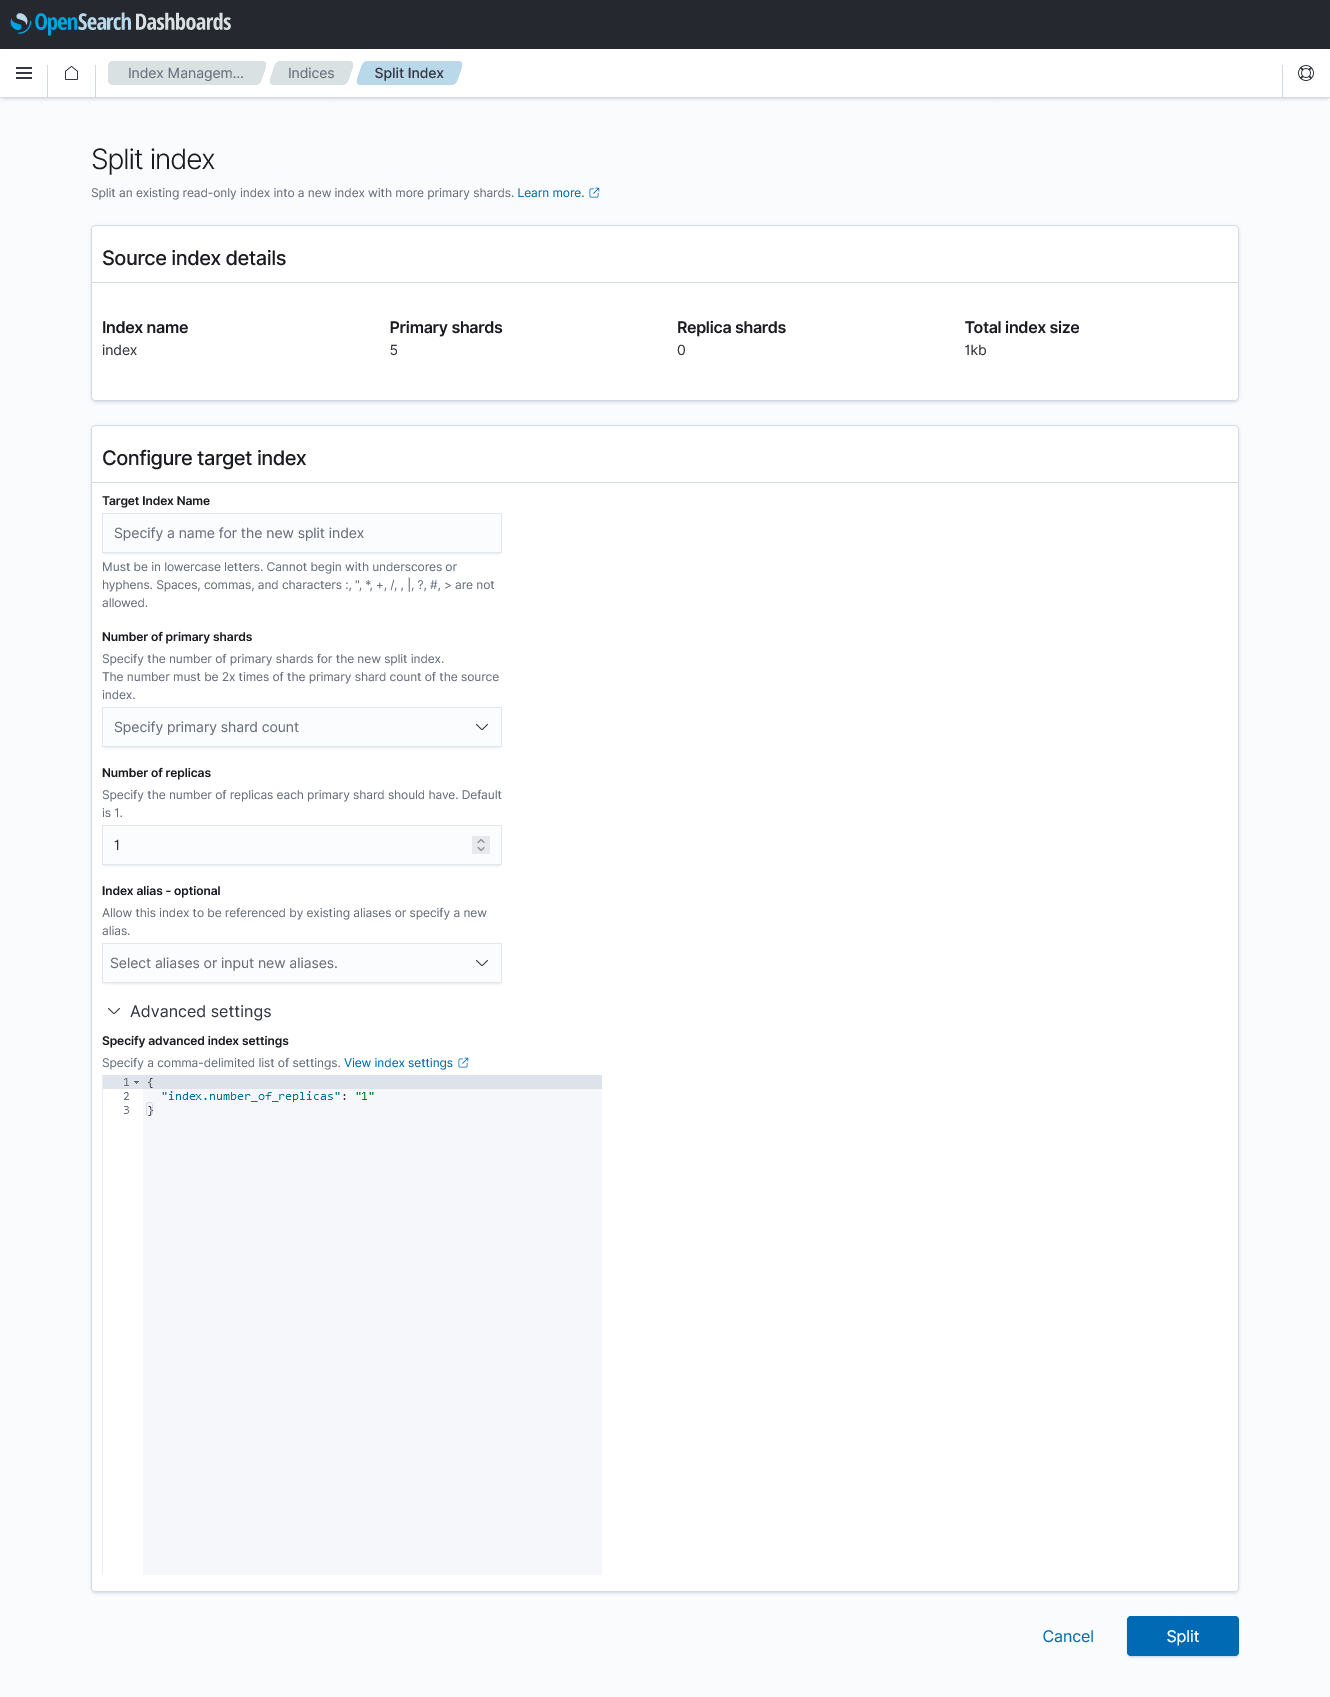
Splitting an index
The split index operation splits an existing read-only index into a new index, splitting each primary shard into a number of primary shards in the new index.
To split an index, select the index you want to split from the Indices list under Index Management. Then choose the Actions button and choose Split from the dropdown list as shown in the following image.
Refreshing an index
Refreshing an index makes new updates to the index visible to search operations.
The refresh operation can be applied only to open indexes.
To refresh all indexes, select Refresh from the Actions dropdown list.
To refresh a particular index, select the index from the Indices list under Index Management. Then select Refresh from the Actions dropdown list.
Flushing an index
The flush operation performs a Lucene commit, writing segments to disk and starting a new translog.
The flush operation can be applied only to open indexes.
To flush all indexes, select Flush from the Actions dropdown list.
To flush a particular index, select the index from the Indices list under Index Management. Then select Flush from the Actions dropdown list.
Clearing an index cache
The clear cache operation can be applied only to open indexes.
To clear all index caches, select Clear cache from the Actions dropdown list.
To clear a particular index cache, select the index from the Indices list under Index Management. Then select Clear cache from the Actions dropdown list.
Deleting an index
If you no longer need an index, you can use the delete index operation to delete it.
To delete an index, select the index you want to delete from the Indices list under Index Management. Then select the Actions button and select Delete from the dropdown list.
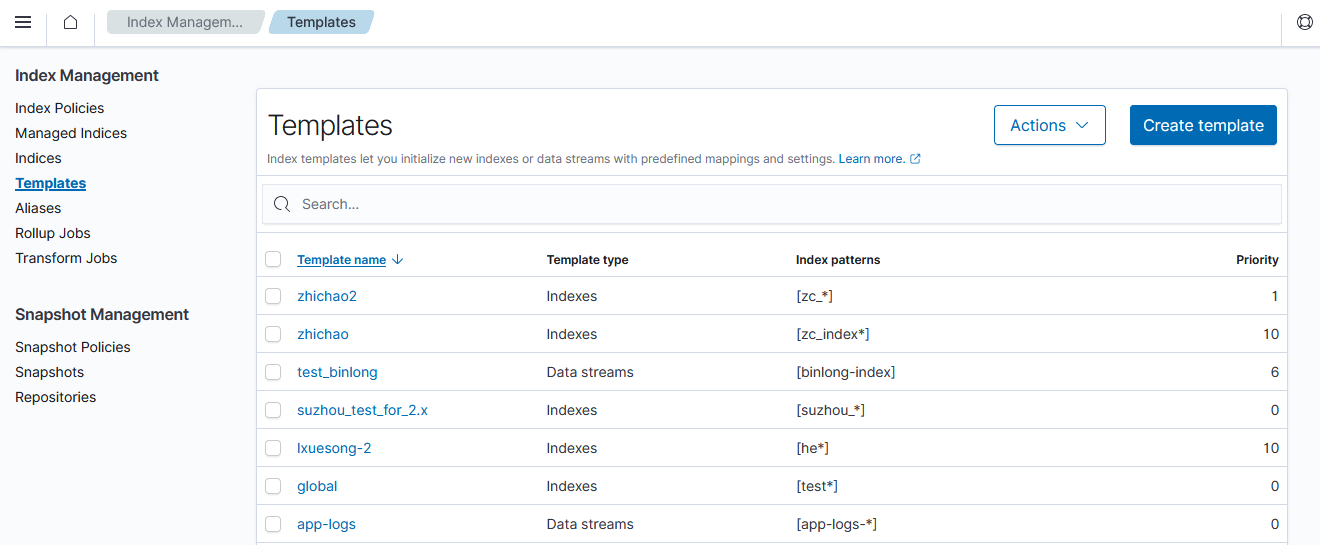
Templates
Index templates let you initialize new indexes with predefined mappings and settings. For example, if you continuously index log data, you can define an index template so that all of the indexes have the same number of shards and replicas as shown in the following image.
Creating a template
To create a template, choose the Create template button on the Templates page under Index Management.
Next, define the template:
- Enter the template name.
- Select the template type.
- Specify any index patterns you would like to use.
- Set the priority of the template.
- Select an index alias.
- Set the number of primary shards.
- Set the number of replicas.
- Set the refresh intervals.
- Add fields and objects for your index mapping using either the visual editor or the JSON editor.
- Under Advanced Settings you can specify advanced index settings with a comma-delimited list as shown in the following image.

Editing a template
To edit a template, select the template you want to edit from the list of templates. Next, select the Actions dropdown list and select the Edit option.
Deleting a template
To delete a template, select the template you want to delete from the list of templates. Next, select the Actions dropdown list and select the Delete option.
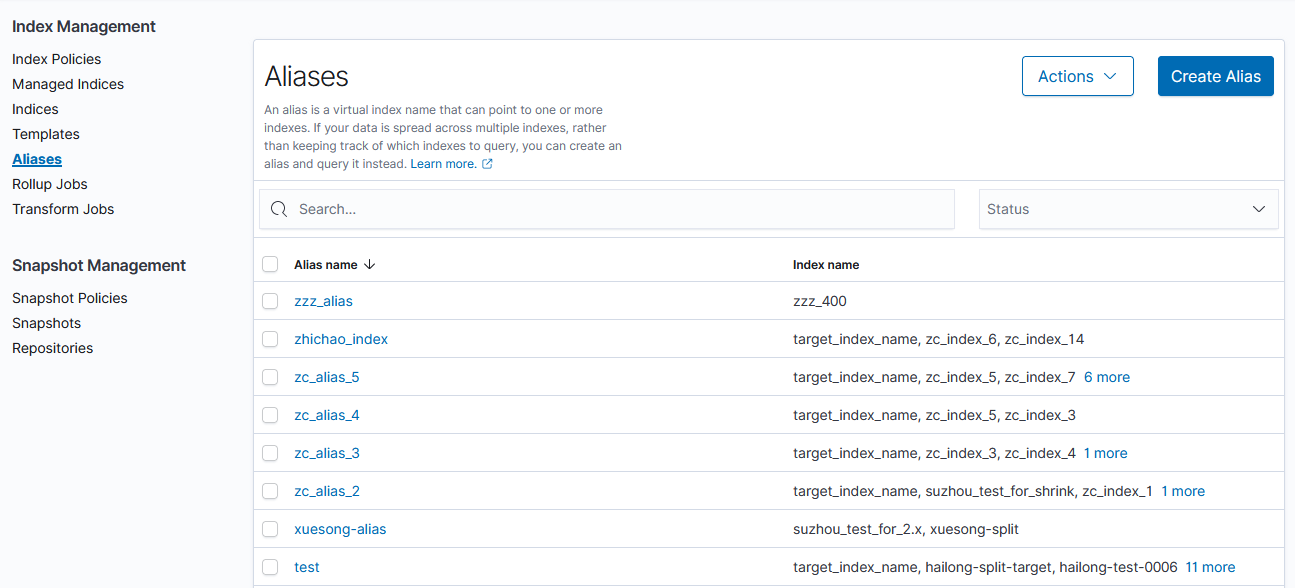
Aliases
An alias is a virtual index name that can point to one or more indexes. If your data is spread across multiple indexes, rather than keeping track of which indexes to query, you can create an alias and query it instead as shown in the following image.
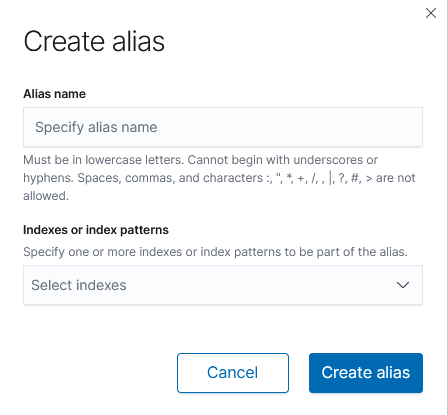
Creating an alias
To create an alias, perform the following steps:
- Choose the Create Alias button on the Aliases page under Index Management.
- Specify the alias name.
- Enter the index, or index patterns, to be included in the alias.
- Choose Create alias as shown in the following image.
Editing an alias
To edit an alias, perform the following steps:
- Select the alias you want to edit.
- Choose the Actions button.
- Choose Edit from the dropdown list.
Deleting an alias
To delete an alias, perform the following steps:
- Select the alias you want to edit.
- Choose the Actions button.
- Choose Delete from the dropdown list.
Refreshing an alias
Refreshing an alias makes new updates to the index visible to search operations.
The refresh operation can be applied only to open indexes associated with the specified aliases.
To refresh a particular alias, select the alias from the Aliases list under Index Management. Then select Refresh from the Actions dropdown list.
Flushing an alias
The flush operation performs a Lucene commit, writing segments to disk and starting a new translog.
The flush operation can be applied only to open indexes associated with the specified aliases.
To flush an alias, select the alias from the Aliases list under Index Management. Then select Flush from the Actions dropdown list.
Clearing an alias cache
The clear cache operation can be applied only to open indexes associated with the specified aliases.
To clear an alias cache, select the alias from the Aliases list under Index Management. Then select Clear cache from the Actions dropdown list.
Rollup jobs
The Rollup Jobs section under Index Management allows you to create or update index rollup jobs.
To create a rollup job, perform the following steps:
- Choose the Create rollup job button on the Rollup Jobs page under Index Management.
- Set the name, source index, and target index.
- Choose Next.
- Set the timestamp field and interval type.
- Optionally, set additional aggregations and metrics.
- Choose Next.
- Under Schedule, check or uncheck Enable job by default.
- Set the Continuous, Execution frequency, Rollup interval, and Pages per execution settings.
- Additionally, you can set an execution delay.
- Choose Next.
- Review the settings for the rollup job and choose Create.
You can also enable and disable rollup jobs by choosing the corresponding buttons on the Rollup Jobs page.
Transform jobs
You can create, start, stop, and complete operations with transform jobs.
To create a transform job, perform the following steps:
- Choose the Create transform job button on the Transform Jobs page under Index Management.
- Set the name, source index, and target index.
- Choose Next.
- Select the fields to transform. From the table, select a field you want to transform by choosing + next to the field name.
- Choose Next.
- Check or uncheck Job enabled by default.
- Set the transform execution interval and whether the schedule is continuous.
- Optionally, set pages per execution under the Advanced dropdown list.
- Choose Next.
- Review the settings for the rollup job and choose Create.
You can also enable and disable rollup jobs by choosing the corresponding buttons on the Transform Jobs page.
Long-running operation status check
Certain index operations take additional time to complete (usually more than 30 seconds, but up to tens of minutes or hours). This is tracked in the index status column on the Indices page.
You can check the status of the reindex, shrink, and split operations because they are one-time, non-recursive operations.
Security integration
Permission control is managed with existing permissions or action groups that are enforced at the API level. There is currently no UI-level permission control. Users with permission to access the ISM plugin are able to view new pages. They can also make changes if they have permission to run the related APIs.
Error handling
Similar to API calls, if the operation fails immediately, you will be notified with an error message. However, if it is a long-running operation, you will be notified of the failure at the time of failure, or you can check the index status on the Indices page.