Snapshot Management
Snapshots are backups of a cluster’s indexes and state. The state includes cluster settings, node information, index metadata (mappings, settings, templates), and shard allocation. The Snapshot Management (SM) interface in OpenSearch Dashboards provides a unified solution for taking and restoring snapshots.
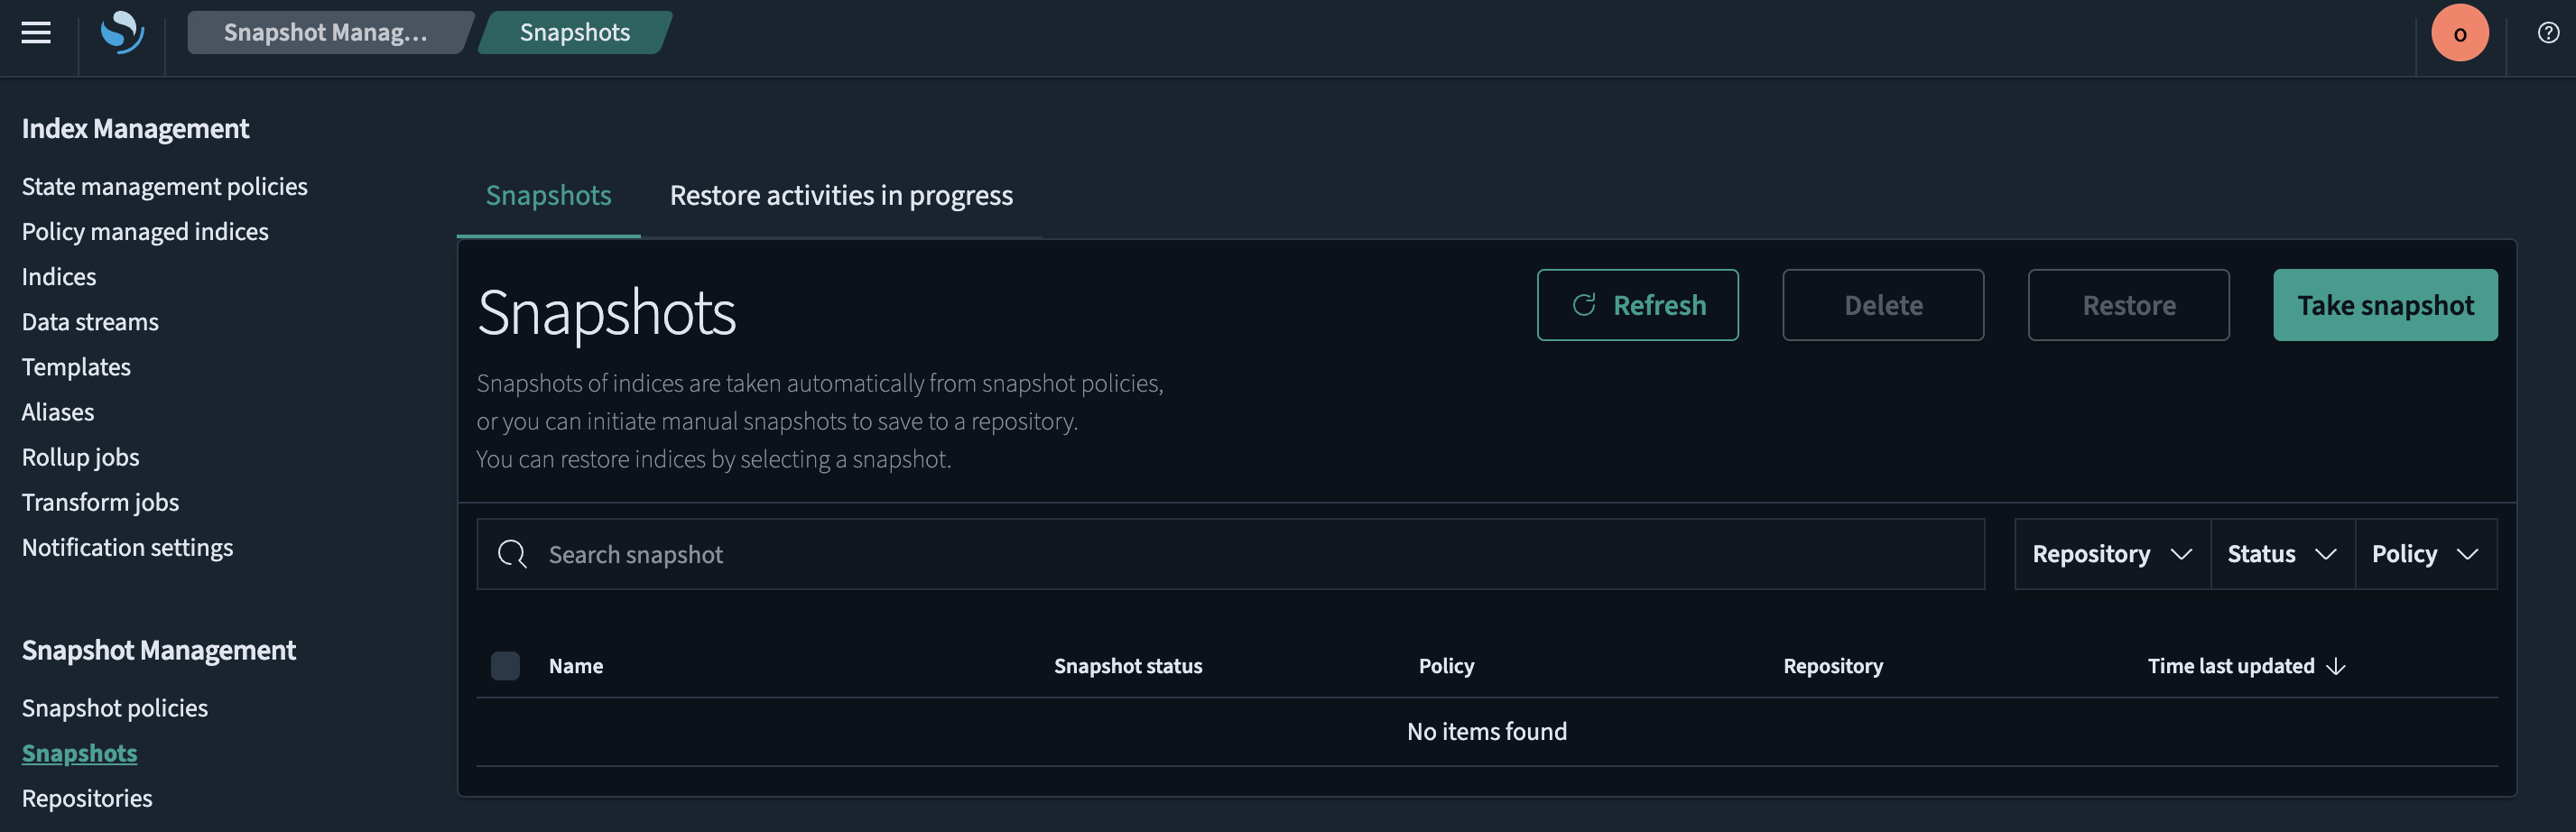
An example of the interface is shown in the following image.
Snapshots use cases
Snapshots have two main uses:
-
Recovering from failure
For example, if cluster health goes red, you might restore the red indexes from a snapshot.
-
Migrating from one cluster to another
For example, if you’re moving from a proof of concept to a production cluster, you might take a snapshot of the former and restore it on the latter.
Creating a repository
Before you create an SM policy, set up a repository for snapshots.
- From the OpenSearch Dashboards main menu, select Management > Snapshot Management.
- In the left panel, under Snapshot Management, select Repositories.
- Choose the Create Repository button.
- Enter the repository name, type, and location.
- (Optional) Select Advanced Settings and enter additional settings for this repository as a JSON object.
Example
{ "chunk_size": null, "compress": false, "max_restore_bytes_per_sec": "40m", "max_snapshot_bytes_per_sec": "40m", "readonly": false } - Choose the Add button.
![]() Note: If you need to automate snapshot creation, you can use a snapshot policy.
Note: If you need to automate snapshot creation, you can use a snapshot policy.
Deleting a repository
To delete a snapshot repository configuration, select the repository from the Repositories list and then choose the Delete button.
Creating an SM policy
Create an SM policy to set up automatic snapshots. An SM policy defines an automated snapshot creation schedule and an optional automated deletion schedule.
- From the OpenSearch Dashboards main menu, select Management > Snapshot Management.
- In the left panel, under Snapshot Management, select Snapshot Policies.
- Select the Create Policy button.
- In the Policy settings section:
- Enter the policy name.
- (Optional) Enter the policy description.
- In the Source and destination section:
- Select or enter source indexes either as a list or as an index pattern.
- Select a repository for snapshots. To create a new repository, select the Create button.
- In the Snapshot schedule section:
- Select the desired snapshot frequency or enter a custom cron expression for snapshot frequency.
- Select the start time and time zone.
- In the Retention period section:
- Choose to retain all snapshots or specify retention conditions (the maximum age of retained snapshots).
- (Optional) In Additional settings, select the minimum and maximum number of retained snapshots, deletion frequency, and deletion start time.
- In the Notifications section, select the snapshot activities you want to be notified about.
- (Optional) In the Advanced settings section, select the desired options:
- Include cluster state in snapshots
- Ignore unavailable indices
- Allow partial snapshots
- Select the Create button.
View, edit, or delete an SM policy
You can view, edit, or delete an SM policy on the policy details page.
- From the OpenSearch Dashboards main menu, select Management > Snapshot Management.
- In the left panel, under Snapshot Management, select Snapshot Policies.
- Click on the Policy name of the policy you want to view, edit, or delete.
The policy settings, snapshot schedule, snapshot retention period, notifications, and last creation and deletion are displayed in the policy details page.
If a snapshot creation or deletion fails, you can view information about the failure in the Last Creation/Deletion section. To view the failure message, click on the cause in the Info column. - To edit or delete the SM policy, select the Edit or Delete button.
Enable, disable, or delete SM policies
- From the OpenSearch Dashboards main menu, select Management > Snapshot Management.
- In the left panel, under Snapshot Management, select Snapshot Policies.
- Select one or more policies in the list.
- To enable or disable selected SM policies, select the Enable or Disable button. To delete selected SM policies, in the Actions list, select the Delete option.
View snapshots
- From the OpenSearch Dashboards main menu, select Management > Snapshot Management.
- In the left panel, under Snapshot Management, select Snapshots. All automatically or manually taken snapshots appear in the list.
- To view a snapshot, click on its Name.
Take a snapshot
Follow these steps to take a snapshot manually:
- From the OpenSearch Dashboards main menu, select Management > Snapshot Management.
- In the left panel, under Snapshot Management, select Snapshots.
- Select the Take snapshot button.
- Enter the snapshot name.
- Select or enter source indexes either as a list or as an index pattern.
- Select a repository for the snapshot.
- (Optional) In the Advanced options section, select the desired options:
- Include cluster state in snapshots
- Ignore unavailable indices
- Allow partial snapshots
- Choose the Add button.
Deleting a snapshot
The Delete button deletes a snapshot from a repository.
- To view a list of your repositories, choose Repositories under the Snapshot Management section.
- To view a list of your snapshots, choose Snapshots under the Snapshot Management section.
Restoring a snapshot
- From the OpenSearch Dashboards main menu, select Management > Snapshot Management.
- In the left panel, under Snapshot Management, select Snapshots. The Snapshots tab is selected by default.
-
Select the checkbox next to the snapshot you want to restore. An example is shown in the following image:
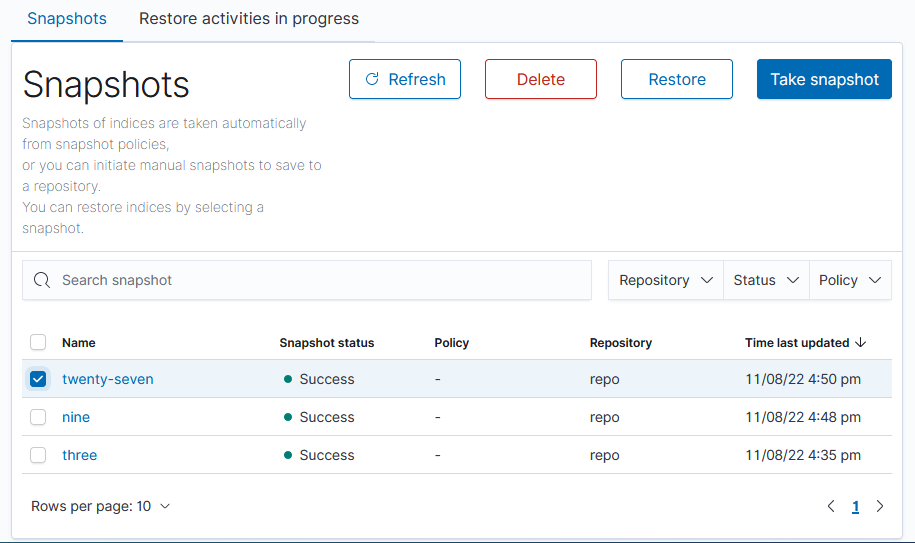
 Note: You can only restore snapshots with the status of
 SuccessorPartial. The status of the snapshot is displayed in the Snapshot status column. -
In the Restore snapshot flyout, select the options for restoring the snapshot.
The Restore snapshot flyout lists the snapshot name and status. To view the list of indexes in the snapshot, select the number under Indices (for example,
27in the following image). This number represents the number of indexes in the snapshot.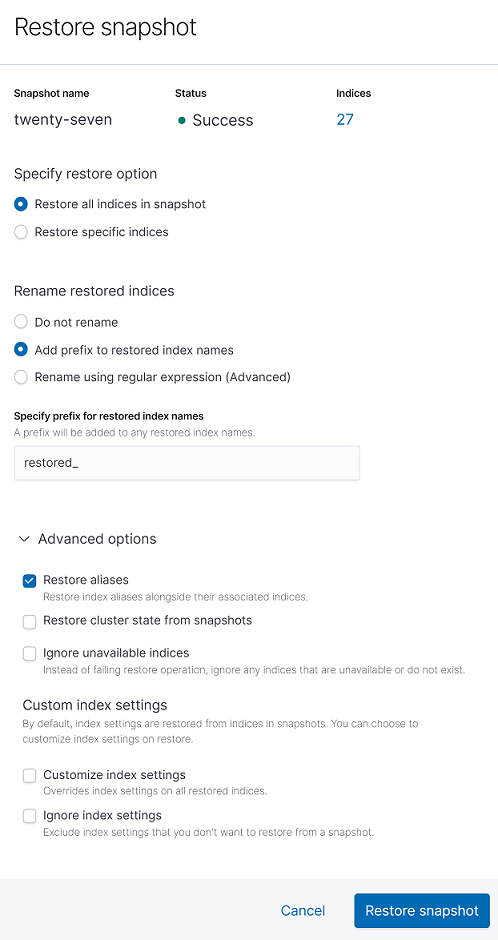
For more information about the options in the Restore snapshot flyout, see Restore snapshots.
Ignoring missing indexes
If you specify which indexes you want to restore from the snapshot and select the Ignore unavailable indices option, the restore operation ignores the indexes that are missing from the snapshot. For example, if you want to restore the
log1andlog2indexes, butlog2is not in the snapshot,log1is restored andlog2is ignored. If you don’t select Ignore unavailable indices, the entire restore operation fails if an index to be restored is missing from a snapshot.Custom index settings
You can choose to customize some settings for the indexes restored from a snapshot:
• Select the Customize index settings checkbox to provide new values for the specified index settings. All newly restored indexes will use these values instead of the ones in the snapshot.
• Select the Ignore index settings checkbox to specify the settings in the snapshot to ignore. All newly restored indexes will use the cluster defaults for these settings.The examples in the following image set
index.number_of_replicasto0,index.auto_expand_replicastotrue, andindex.refresh_intervalandindex.max_script_fieldsto the cluster default values for all newly restored indexes.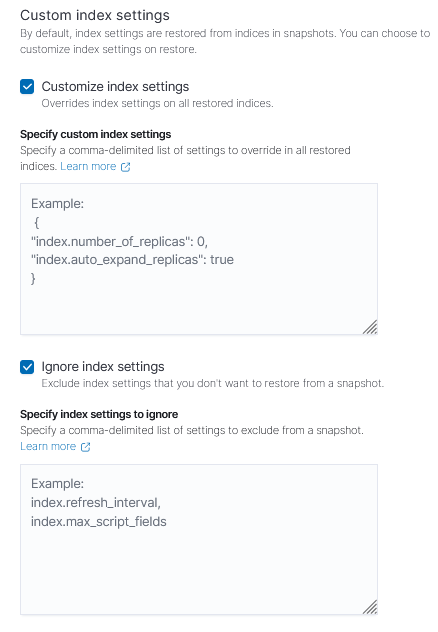
For more information about index settings, see Index settings.
For a list of settings that you cannot change or ignore, see Restore snapshots.
After choosing the options, select the Restore snapshot button.
-
(Optional) To monitor the restore progress, select View restore activities in the confirmation dialog. You can also monitor the restore progress at any time by selecting the Restore activities in progress tab, as shown in the following image.
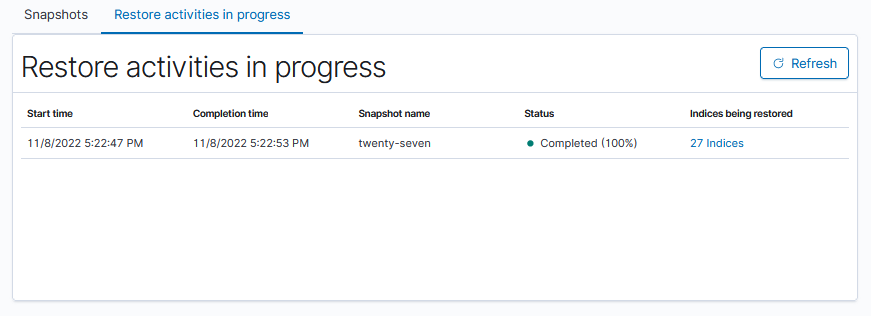
You can view the percentage of the job that has been completed in the Status column. Once the snapshot restore is complete, the Status changes to
Completed (100%). Note: The Restore activities in progress panel is not persistent. It displays only the progress of the current restore operation. If multiple restore operations are running, the panel displays the most recent one.To view the status of each index being restored, select the link in the Indices being restored column (in the preceding image, the
27 Indiceslink). The Indices being restored flyout (shown in the following image) displays each index and its restore status.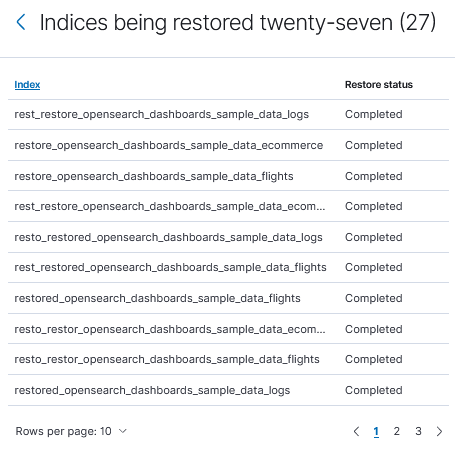
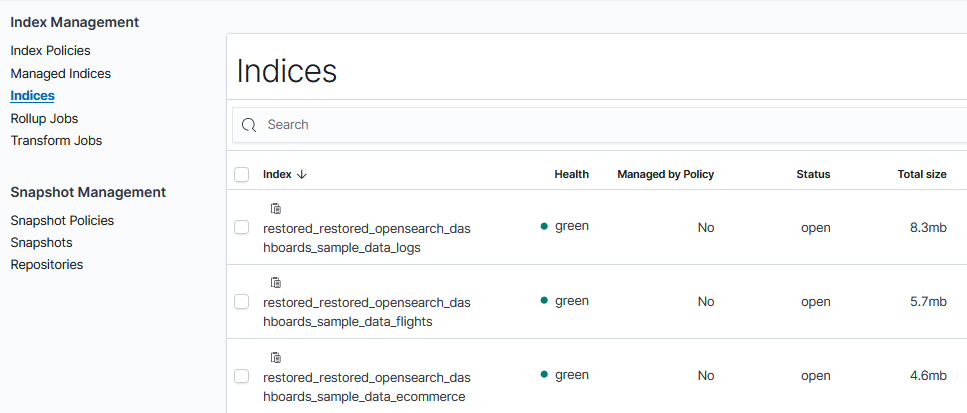
After the restore operation is complete, the restored indexes are listed in the Indices panel. To view the indexes, in the left panel, under Index Management, choose Indices.